Easy No-Knead Rustic Sandwich Bread pairs a golden seeded crust with a soft, sliceable center. This same-day yeast loaf is mixed with a spoon, allowed to rise, and baked in a large loaf pan, so you do not need a stand mixer or a hand-kneading session.
A Rustic Crust Without a Kneading Session
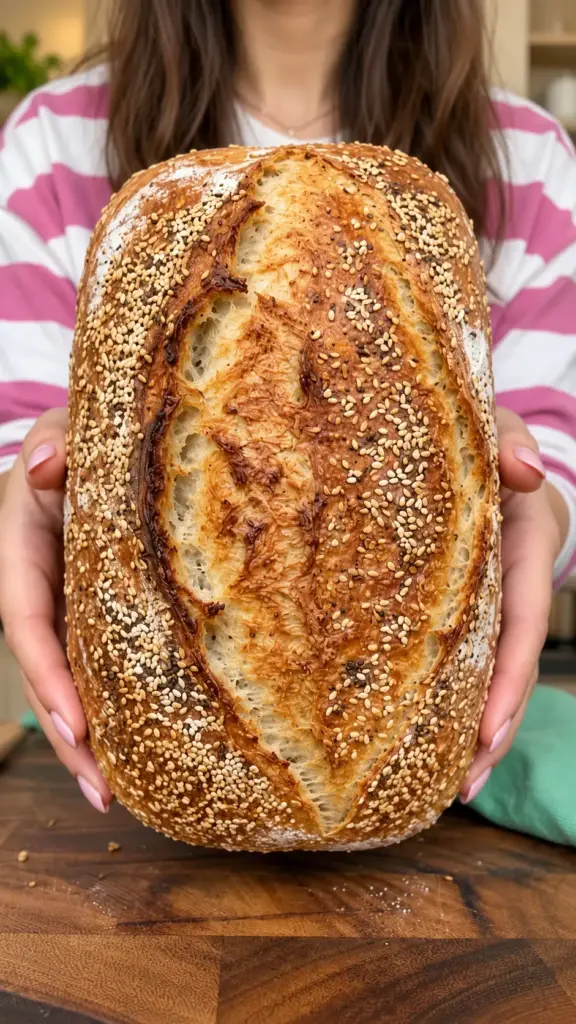
This is a commercial-yeast loaf, not sourdough. The high-moisture dough develops structure while it rests, and the pan supports it as it rises and bakes. The reference photo inspires the rectangular loaf, sesame-speckled crust, and natural central split; the exact shape of that split will vary from loaf to loaf.
Ingredients
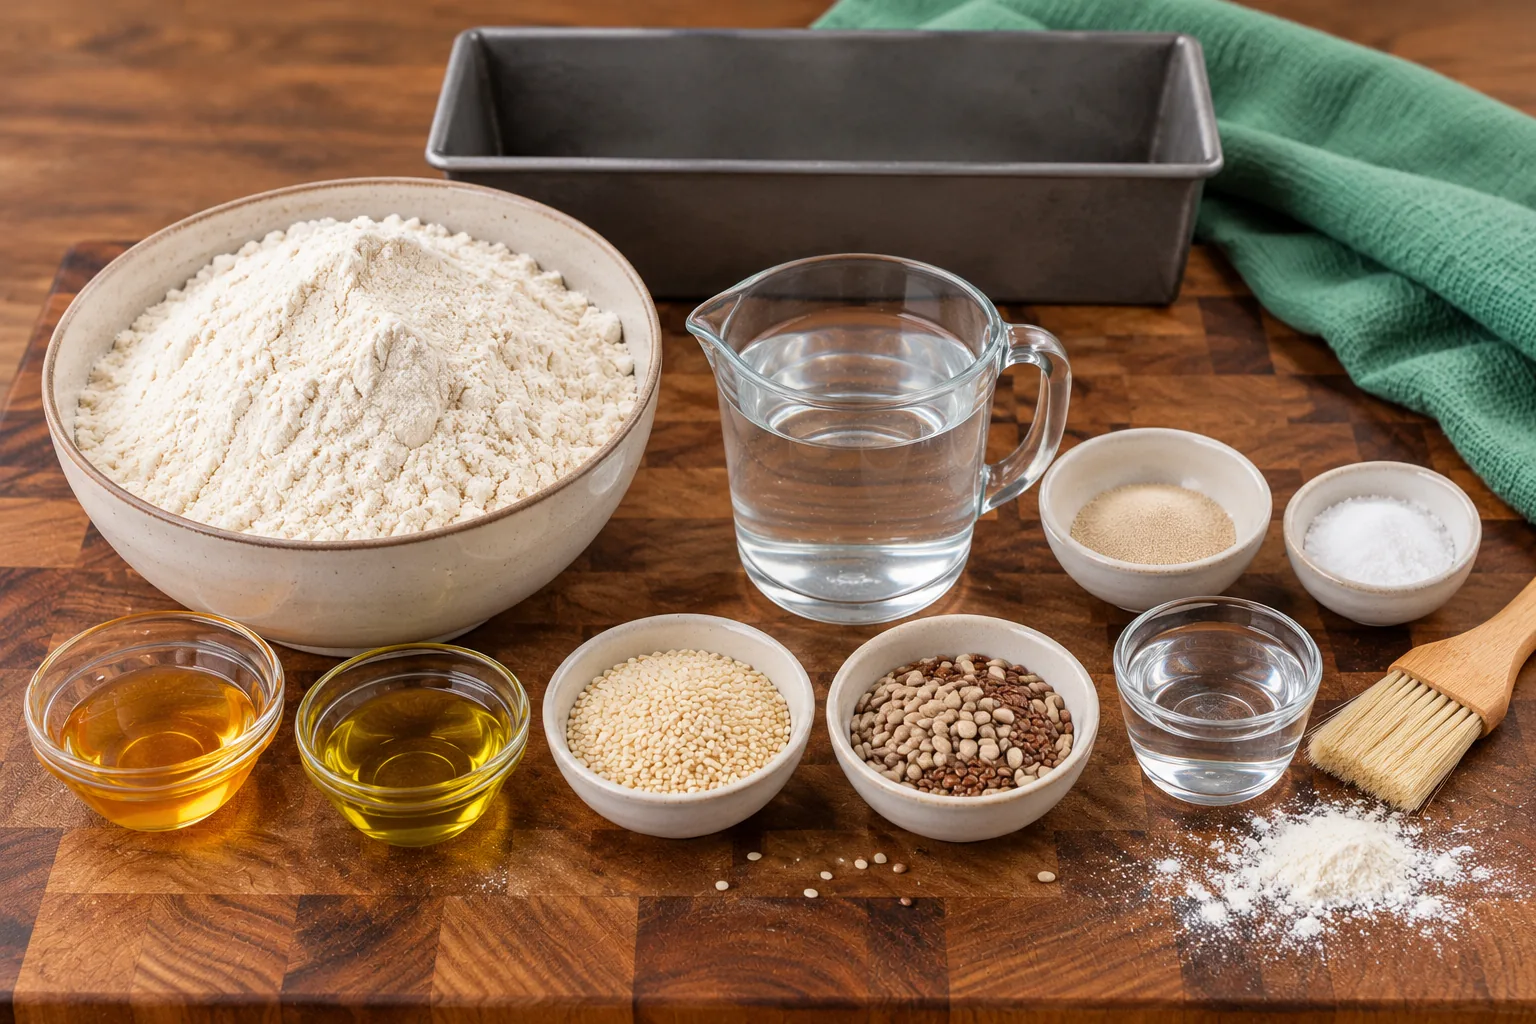
For the Bread
- 500 g bread flour
- 375 ml lukewarm water
- 7 g instant yeast (2¼ teaspoons)
- 10 g fine salt
- 1 tablespoon honey or sugar
- 2 tablespoons olive oil
For the Rustic Topping
- 2 tablespoons sesame seeds
- 1 tablespoon mixed seeds (optional)
- 1 tablespoon water, for brushing
- A little flour, for dusting
Ingredient Details That Matter
The dough uses 375 ml water for 500 g flour, or 75% hydration before the small contribution from honey. Stickiness is part of the method, not a sign that large amounts of flour are missing. Choose either honey or sugar, not both; the ingredient photo shows the honey option. The water for brushing is separate from the 375 ml in the dough, and the mixed seeds are optional.
Equipment
- Kitchen scale
- Large mixing bowl and sturdy spoon
- Dough scraper or spatula
- 10-by-5-inch metal loaf pan, at least 3 inches deep
- Oven-rated parchment
- Pastry brush
- Optional bread lame and instant-read thermometer
- Wire cooling rack and serrated knife
Instructions
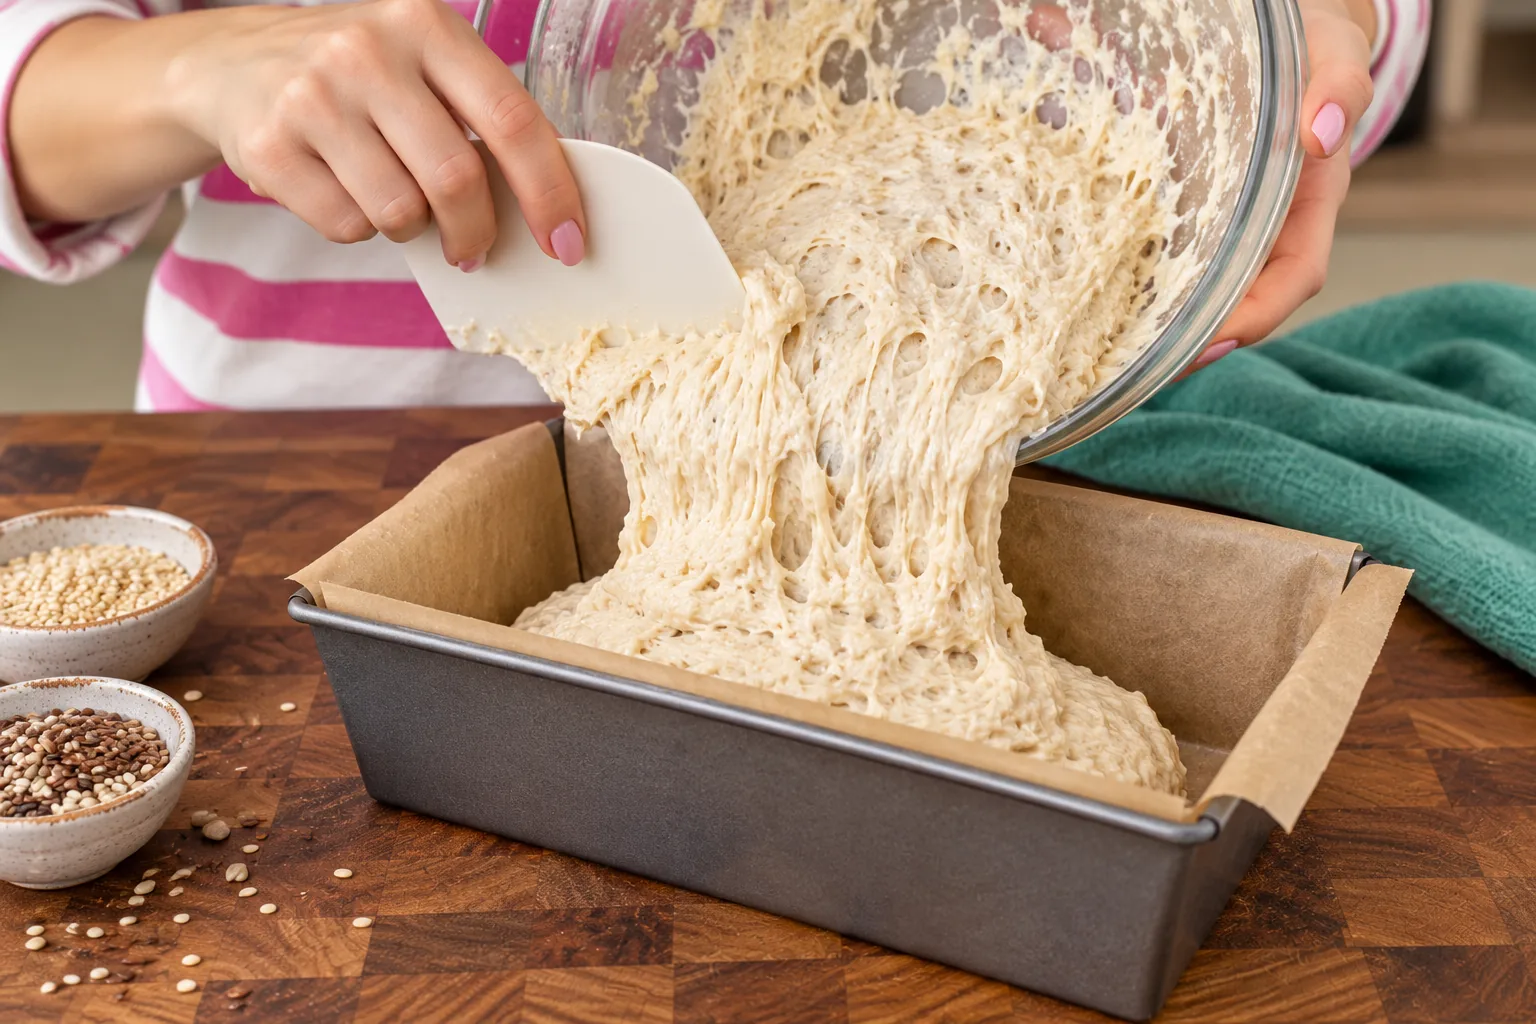
- Mix: In a large bowl, whisk the bread flour, instant yeast, and fine salt. Stir the honey or sugar into the lukewarm water, then add the olive oil. Pour into the flour and mix vigorously with a sturdy spoon for about 2 minutes, until evenly combined with no dry pockets. Use water around 90–100°F (32–38°C), not hot. The dough should be sticky and shaggy rather than firm enough to knead.
- First rise: Cover the bowl and let rise at a comfortable room temperature for about 90–120 minutes, until roughly doubled and visibly bubbly. Watch the dough, especially in a warm kitchen, because this amount of yeast can work quickly. Do not leave this dough overnight at room temperature.
- Transfer to the pan: Line a large 10-by-5-inch (25-by-13-cm) metal loaf pan, at least 3 inches deep, with parchment rated for the baking temperature. Use a damp spoon or dough scraper to gently stir the dough through 6–8 strokes to release the largest bubbles, then scrape it into the pan. Smooth the top with a damp spatula. No flour-covered kneading or tight shaping is needed.
- Second rise: Cover loosely and let rise for about 30–60 minutes, until visibly puffy and roughly 50–75% larger than when it entered the pan. It may approach the rim, depending on pan depth; do not insist that it rise high above a deep pan. Preheat the oven to 425°F (220°C), with a rack slightly below the middle, during this rise.
- Top: Use the separate water for brushing: gently brush the surface with up to 1 tablespoon, just enough to dampen it without puddles. Sprinkle with the sesame seeds and the optional mixed seeds, then add a little flour as a very light dusting. If the surface is stable enough, make one quick shallow lengthwise cut, about 1/4 inch (6 mm) deep, with a sharp bread lame. If the dough is too soft to score cleanly, skip the cut rather than repeatedly dragging through it.
- Bake: Bake at 425°F (220°C) for 15 minutes, then reduce the oven to 375°F (190°C) without removing the loaf. Bake another 30–35 minutes, about 45–50 minutes total, until the crust is deeply golden and the loaf is baked through. Tent loosely with foil if the seeds or top darken early. A thermometer inserted into the center should read about 200–205°F (93–96°C). If the center needs more time, keep baking under the foil.
- Cool fully: Let the loaf sit in the pan for 10 minutes, then lift it out using the parchment and remove the paper. Cool on a wire rack for at least 2 hours in total, or until the center is no longer warm, before slicing with a serrated knife. Cutting too early can compress the crumb and make it appear gummy.
Helpful Tips
- Weigh the flour and water for the most consistent sticky dough.
- Use bread flour for this wet formula; a direct swap to weaker flour may change the structure.
- Cover during both rises so the surface does not dry out.
- Mix thoroughly at the start, but do not keep beating down the rising dough.
- Use the large pan specified rather than cramming the batch into a small 8-by-4-inch tin.
- Keep the brushing water and flour dusting light so they do not form a thick paste.
- Scoring is optional for very soft dough and does not need to reproduce the photo perfectly.
- Let the center cool before slicing; a crisp crust alone does not mean the inside is ready to cut.
Troubleshooting
If the dough barely rises, check yeast freshness and room temperature. If it rises rapidly and then collapses, it has likely gone too far; begin watching sooner in warm conditions. A gummy middle can come from underbaking or slicing hot bread. Check the center, cool completely, and avoid judging doneness only from the browned top.
Serving Ideas
Cut about fourteen slices for sandwiches or toast, adjusting thickness to your preference. The olive oil softens the inside, while the seeded crust is more rustic than a packaged soft sandwich loaf. Toasting highlights the sesame flavor and is a useful way to refresh slices on the second day.
Timing and Yield
Allow about 15 minutes active preparation, 2 hours for the first rise, about 45 minutes for the second rise, 50 minutes baking, and at least 2 hours cooling. That is roughly 5 hours 50 minutes from mixing to slicing. The rises may finish sooner or take longer, so follow the visual cues.
Simple Variations
- Choose the sugar option instead of honey for a loaf without honey; use the same tablespoon measure.
- Leave out the optional mixed seeds and keep the sesame topping for a simpler crust.
- For a less rustic surface, omit the optional flour dusting while retaining the water and seeds.
Storage
Once completely cool, store the unfilled loaf in a bread bag or airtight container at cool room temperature for up to 2 days. Freeze sliced portions, well wrapped, for up to 2 months for best quality. Do not bag warm bread, which traps condensation. Discard bread that develops mold.
Reheating
Toast slices straight from frozen, or thaw them covered at room temperature. To refresh a larger thawed portion, wrap loosely in foil and warm at 325°F (165°C) for about 10–15 minutes. Remove the foil briefly at the end if you prefer a crisper crust.
Allergen Notes
Contains wheat and sesame. Optional mixed seeds may introduce other allergens; check their packaging. The honey version is not vegan, while the sugar option avoids honey.
FAQ
Is this dough supposed to be sticky?
Yes. This is a wet, spoon-mixed dough. A scraper and damp spatula make it easier to handle; adding enough flour to form a dry kneadable ball changes the recipe.
Can I let it rise overnight?
Not with the full 7 g instant yeast at room temperature. This recipe is written for same-day rises. An overnight method would need a different schedule and temperature control.
Do I need to do stretch-and-folds?
No. Mix thoroughly, allow the first rise, gently deflate with a few spoon strokes, and transfer to the pan. There are no scheduled stretch-and-fold rounds.
Can I use a smaller loaf pan?
The batch makes a large loaf. A smaller pan may overflow or leave a thick underbaked middle. Use the stated large pan; dividing into two smaller pans would require separate proofing and baking adjustments.
Why did my loaf split differently from the photo?
Dough strength, proofing, seed coverage, and the optional score affect where the crust opens. A different split is normal and does not by itself indicate a failed loaf.
Why wait so long before slicing?
The moist center needs time to set as it cools. Slicing while warm can squash it and leave a gummy-looking cut surface even when the loaf is baked.
Conclusion
Keep the dough sticky, choose a large enough pan, and let the loaf cool all the way through. Those small details make this no-knead bread easier to handle and help turn its rustic seeded crust into neat, useful sandwich slices.
Print
Easy No-Knead Rustic Sandwich Bread
- Prep Time: 15 minutes
- Cook Time: 50 minutes
- Total Time: 5 hours 50 minutes
- Yield: 1 large loaf (about 14 slices) 1x
- Category: Breakfast
- Method: Baking
Description
A large no-knead yeast sandwich loaf with olive oil, a rustic golden crust, sesame seeds, and an optional mixed-seed topping.
Ingredients
- 500 g bread flour
- 375 ml lukewarm water
- 7 g instant yeast (2¼ teaspoons)
- 10 g fine salt
- 1 tablespoon honey or sugar
- 2 tablespoons olive oil
- 2 tablespoons sesame seeds
- 1 tablespoon mixed seeds (optional)
- 1 tablespoon water, for brushing
- A little flour, for dusting
Instructions
Step 1 Mix: In a large bowl, whisk the bread flour, instant yeast, and fine salt. Stir the honey or sugar into the lukewarm water, then add the olive oil. Pour into the flour and mix vigorously with a sturdy spoon for about 2 minutes, until evenly combined with no dry pockets. Use water around 90–100°F (32–38°C), not hot. The dough should be sticky and shaggy rather than firm enough to knead.
Step 2 First rise: Cover the bowl and let rise at a comfortable room temperature for about 90–120 minutes, until roughly doubled and visibly bubbly. Watch the dough, especially in a warm kitchen, because this amount of yeast can work quickly. Do not leave this dough overnight at room temperature.
Step 3 Transfer to the pan: Line a large 10-by-5-inch (25-by-13-cm) metal loaf pan, at least 3 inches deep, with parchment rated for the baking temperature. Use a damp spoon or dough scraper to gently stir the dough through 6–8 strokes to release the largest bubbles, then scrape it into the pan. Smooth the top with a damp spatula. No flour-covered kneading or tight shaping is needed.
Step 4 Second rise: Cover loosely and let rise for about 30–60 minutes, until visibly puffy and roughly 50–75% larger than when it entered the pan. It may approach the rim, depending on pan depth; do not insist that it rise high above a deep pan. Preheat the oven to 425°F (220°C), with a rack slightly below the middle, during this rise.
Step 5 Top: Use the separate water for brushing: gently brush the surface with up to 1 tablespoon, just enough to dampen it without puddles. Sprinkle with the sesame seeds and the optional mixed seeds, then add a little flour as a very light dusting. If the surface is stable enough, make one quick shallow lengthwise cut, about 1/4 inch (6 mm) deep, with a sharp bread lame. If the dough is too soft to score cleanly, skip the cut rather than repeatedly dragging through it.
Step 6 Bake: Bake at 425°F (220°C) for 15 minutes, then reduce the oven to 375°F (190°C) without removing the loaf. Bake another 30–35 minutes, about 45–50 minutes total, until the crust is deeply golden and the loaf is baked through. Tent loosely with foil if the seeds or top darken early. A thermometer inserted into the center should read about 200–205°F (93–96°C). If the center needs more time, keep baking under the foil.
Step 7 Cool fully: Let the loaf sit in the pan for 10 minutes, then lift it out using the parchment and remove the paper. Cool on a wire rack for at least 2 hours in total, or until the center is no longer warm, before slicing with a serrated knife. Cutting too early can compress the crumb and make it appear gummy.
Notes
Use either honey or sugar. Mixed seeds are optional. The 1 tablespoon brushing water is separate from the dough water. Use a large 10-by-5-inch pan, at least 3 inches deep. Same-day method, not an overnight rise. Total time includes at least 2 hours cooling. Once completely cool, store the unfilled loaf in a bread bag or airtight container at cool room temperature for up to 2 days. Freeze sliced portions, well wrapped, for up to 2 months for best quality. Do not bag warm bread, which traps condensation. Discard bread that develops mold.