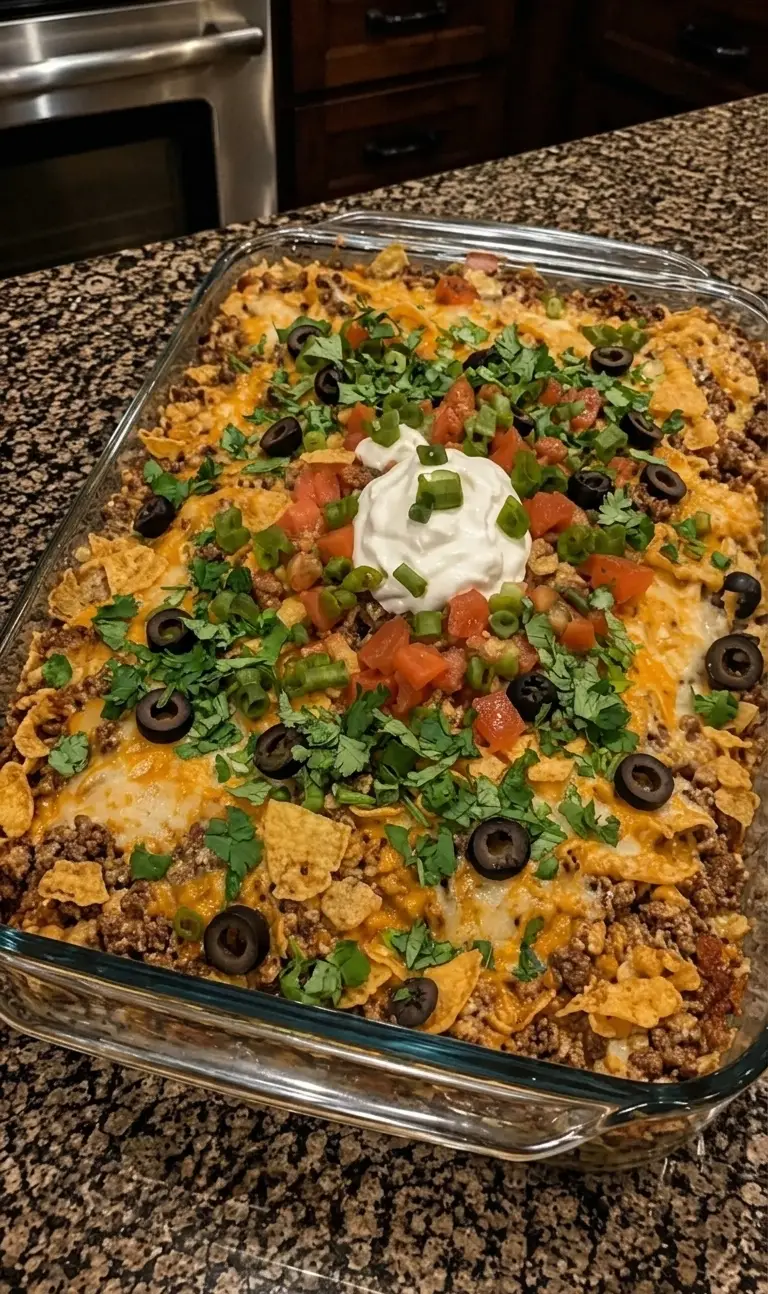
Mexican Loaded Taco Casserole is the ultimate weeknight comfort food that captures all the bold, satisfying flavors of tacos in an easy, layered, oven-baked form. Seasoned ground beef simmers with taco seasoning and salsa, then gets stacked between layers of lightly crushed tortilla chips, cool sour cream, and generous amounts of melted Mexican-blend cheese. Once baked until bubbling and golden, the casserole is finished with fresh diced tomatoes, bright green onions, optional black olives, and cilantro for color, crunch, and freshness. The result is a hearty, cheesy, crowd-pleasing dish that feels festive yet requires minimal effort. It delivers the familiar taste of taco night without the need to assemble individual tacos, making it ideal for family dinners, potlucks, game days, or any time you want maximum flavor with straightforward preparation. Every scoop offers a mix of savory beef, creamy elements, crispy chips that soften just enough into the layers, and the bright contrast of fresh toppings. This casserole turns simple pantry and refrigerator staples into a complete, satisfying meal that consistently disappears fast.
Why is this recipe so popular?
This taco casserole has become a favorite for many practical and flavor-driven reasons. First, it solves the classic “taco night” challenge of keeping everything hot and organized while serving a group. Instead of setting out multiple toppings and tortillas, everything is layered and baked together, so the meal comes to the table ready to scoop. Second, the flavor profile is broadly appealing: seasoned beef, salsa, melted cheese, and the familiar crunch of tortilla chips create a taste that feels both nostalgic and exciting. Third, the recipe is highly accessible. Most ingredients are inexpensive and commonly stocked, and the method uses basic skillet cooking followed by simple layering. Fourth, it is extremely customizable—spice levels, cheese amounts, and toppings can be adjusted without changing the core technique—making it easy to suit different preferences or dietary needs. Fifth, it feeds a crowd efficiently and produces excellent leftovers that reheat well. Social media and family recipe blogs have amplified its popularity because the finished dish looks colorful and abundant, with melted cheese and fresh toppings creating an inviting presentation. Finally, it delivers the comfort of a casserole with the fun, bold character of Mexican-inspired flavors, striking a balance that keeps people coming back to it again and again.
Why You’ll Love This Recipe
You will love this Mexican Loaded Taco Casserole because it combines convenience, bold flavor, and satisfying textures in one baking dish. The active cooking time is short—mostly browning the beef and stirring in seasoning and salsa—while the oven handles the rest. The layers create interesting contrasts: the chips soften slightly where they meet the hot beef and cheese yet retain some crunch, the sour cream adds cool creaminess that balances the seasoned meat, and the final fresh toppings keep everything bright. It is a complete meal in a single pan, requiring little more than a green salad or simple side if you want extra vegetables. The recipe is forgiving; slight variations in chip quantity or cheese amount still produce a delicious result. It scales easily for larger groups and is ideal for feeding kids and adults alike. Once baked, it stays warm for serving and looks impressive with its melted cheese and colorful toppings. Most of all, it consistently delivers the satisfying, cheesy, taco-inspired experience people crave, without the assembly-line work of traditional tacos.
Ingredients
- 1½ pounds ground beef (80/20 or 85/15 recommended for flavor and moisture)
- 1 small onion, diced
- 1 packet taco seasoning (or approximately 2–3 tablespoons homemade equivalent)
- 1 cup salsa (mild, medium, or hot according to preference)
- 1 cup sour cream (full-fat preferred for richness and stability)
- 3 cups shredded Mexican blend cheese (or a mix of cheddar and Monterey Jack)
- 4 cups tortilla chips, lightly crushed (enough for two layers)
- 1 cup diced tomatoes (fresh Roma or similar, seeds removed if very watery)
- ½ cup sliced green onions
- ½ cup sliced black olives (optional)
- ¼ cup chopped fresh cilantro (optional)
- Salt and black pepper, to taste
These quantities fill a standard 9×13-inch baking dish and typically serve 6 to 8 people. The ground beef forms the hearty, seasoned base. The onion adds aromatic sweetness as it cooks down. Taco seasoning and salsa provide the signature bold, savory, slightly spicy flavor. Sour cream contributes cool creaminess that balances the heat and richness. The generous amount of Mexican-blend cheese ensures every layer is gooey and flavorful. Lightly crushed tortilla chips create structure and the classic taco-chip texture. Fresh diced tomatoes, green onions, olives, and cilantro are added after baking so they stay crisp, colorful, and bright rather than wilting in the heat. Adjust salt carefully because the taco seasoning and cheese already contribute significant sodium.
Preparation
Step 1 Preheat the oven to 375°F (190°C). Lightly grease a 9×13-inch baking dish with nonstick cooking spray or a thin film of oil. This prevents sticking and makes serving and cleanup easier. Set the dish aside while you prepare the filling. Ensuring the oven is fully heated before the casserole goes in promotes even melting of the cheese and thorough heating of the layers.
Step 2 Place a large skillet over medium-high heat. Add the ground beef and diced onion. Cook for 7 to 9 minutes, breaking the beef into small crumbles with a wooden spoon or spatula, until the beef is fully browned and no longer pink and the onion has softened and turned translucent. Carefully drain any excess grease, leaving just a small amount in the pan for flavor. Thorough browning develops deep savory notes that form the foundation of the casserole.
Step 3 Sprinkle the taco seasoning over the beef and onion mixture. Pour in the cup of salsa. Stir well to combine, then reduce the heat to medium and let the mixture simmer for 2 to 3 minutes. This short simmer allows the seasoning to bloom and the salsa to meld with the beef, creating a cohesive, flavorful filling. Taste and add a pinch of salt or black pepper only if needed. Remove the skillet from the heat once the mixture is well combined and slightly thickened.
Step 4 Spread approximately half of the lightly crushed tortilla chips in an even layer across the bottom of the prepared baking dish. The chips should cover the surface without large gaps; gentle crushing (not powder) preserves texture while allowing the chips to layer neatly.
Step 5 Spoon half of the seasoned beef mixture evenly over the chip layer. Dollop half of the sour cream across the beef in small spoonfuls, then gently spread it as evenly as possible. Sprinkle half of the shredded Mexican-blend cheese over the sour cream layer. These alternating layers of chips, beef, sour cream, and cheese create the signature loaded texture and flavor distribution.
Step 6 Repeat the layering process: add the remaining crushed tortilla chips, followed by the rest of the beef mixture, the remaining sour cream, and the final portion of shredded cheese. The top should be covered generously with cheese so it melts into a bubbly, golden blanket. Press down very lightly with a spatula if needed to settle the layers, but avoid compacting them too firmly.
Step 7 Place the uncovered casserole in the preheated oven and bake for 20 to 25 minutes. The exact time depends on your oven; look for the cheese to be completely melted, bubbly, and beginning to turn golden in spots, and for the edges of the casserole to show gentle bubbling. The chips will soften slightly where they contact the hot filling while retaining some structure.
Step 8 Carefully remove the casserole from the oven and let it rest for 5 minutes. This brief cooling period allows the layers to set slightly, making scooping cleaner and preventing the filling from being overly runny.
Step 9 Scatter the diced tomatoes, sliced green onions, optional black olives, and optional chopped cilantro evenly over the hot, melted cheese. Adding these fresh ingredients after baking keeps them crisp, bright, and colorful rather than cooked and muted. The contrast between the hot, cheesy casserole and the cool, fresh toppings is one of the dish’s best features.
Step 10 Serve the casserole warm, scooping down through all the layers so each portion includes chips, beef, sour cream, cheese, and fresh toppings. Offer extra salsa, sour cream, or hot sauce on the side for those who want additional customization.
Variation
This taco casserole is highly adaptable. For a spicier version, use hot salsa, add a diced jalapeño with the onion, or stir in a pinch of cayenne or chipotle powder with the taco seasoning. Ground turkey or ground chicken can replace the beef; brown them the same way and consider adding a teaspoon of oil if the meat is very lean. For a vegetarian version, substitute plant-based ground “beef” or a mixture of black beans and corn, adjusting seasoning as needed. Different cheeses—pepper jack for heat, pure cheddar for sharpness, or a dairy-free alternative—work well. Some cooks add a layer of refried beans or cooked rice for extra heartiness. Crushed corn chips or a mix of tortilla and corn chips can replace the standard tortilla chips. For a lower-carbohydrate approach, reduce the chip quantity or replace part of the chips with a layer of sautéed zucchini or cauliflower rice, though the texture will change. Individual portions can be made in smaller baking dishes or ramekins for easier serving and portion control. The basic layering method remains the same across these variations, so you can tailor the casserole to available ingredients or dietary preferences without learning a new technique.
COOKING Note
Several details help ensure the best texture and flavor. Drain the ground beef well after browning to avoid a greasy casserole. Lightly crushing the tortilla chips (rather than pulverizing them) preserves some crunch while allowing them to layer evenly. Spreading the sour cream in dollops and then gently smoothing it prevents it from mixing completely into the beef, maintaining distinct creamy pockets. Baking uncovered allows excess moisture to evaporate and the cheese to brown properly. Adding the fresh toppings only after baking is essential for color, texture, and brightness—putting them on before baking causes the tomatoes and green onions to soften and lose their appeal. Resting the casserole for a few minutes after baking helps the layers hold together when scooped. If the top browns too quickly, you can loosely tent the dish with foil for the last few minutes. Finally, use a sturdy spatula or large spoon to serve so each portion includes a cross-section of all layers.
Serving Suggestions
Serve the Mexican Loaded Taco Casserole hot, scooped into bowls or onto plates so the layers remain visible. It pairs well with simple sides that complement the bold flavors: a crisp green salad with lime vinaigrette, Mexican-style street corn, cilantro-lime rice, or refried beans. Fresh avocado slices or guacamole on the side add creaminess and cool contrast. For a full taco-night feel, offer extra salsa, sour cream, pickled jalapeños, and lime wedges at the table. The casserole is substantial enough to stand alone but benefits from a light vegetable side to balance the richness. Leftovers reheat well in the microwave or covered in a 350°F oven; a few minutes under the broiler can refresh the cheese topping. It also travels successfully for potlucks when kept warm.
Tips
Brown the beef thoroughly for maximum flavor development. Dice the onion relatively small so it softens evenly and blends into the mixture. Taste the seasoned beef before layering and adjust seasoning carefully, remembering that the cheese and chips also contribute salt. Crush the tortilla chips just enough to create even layers without turning them into fine crumbs. Use full-fat sour cream for the best texture and richness; reduced-fat versions can become watery when heated. Shred your own cheese when possible for superior melting. Add the fresh toppings only after baking so they stay crisp and vibrant. For make-ahead convenience, prepare the beef mixture up to a day in advance, cool it, and refrigerate; assemble the casserole just before baking. Leftovers keep in the refrigerator for 3–4 days. If the casserole seems dry after reheating, a small dollop of sour cream or salsa restores moisture. Finally, a 9×13-inch dish is ideal for the given quantities; using a smaller dish may require adjusting layer thickness and baking time.
Prep Time: 15 minutes Cooking Time: 25–30 minutes Total Time: Approximately 40–45 minutes (including resting)
Nutritional Information (Approximate values per serving, based on 8 servings; actual amounts vary with exact brands and quantities)
Calories: 480–580 Protein: 28–34 g Sodium: 900–1300 mg Carbohydrates: 25–32 g Fat: 30–38 g Fiber: 2–4 g Sugar: 3–5 g
These estimates assume 80/20 ground beef, full-fat sour cream and cheese, a standard taco-seasoning packet, and typical tortilla chips. Using leaner ground beef, reduced-fat dairy, or low-sodium seasoning and salsa will lower the calorie, fat, and sodium figures. The tortilla chips contribute a notable portion of the carbohydrates. Adding extra vegetables or serving with a large salad increases overall volume and nutrients with modest impact on the core calorie count.
FAQs
Can I make this casserole ahead of time? Yes. You can cook the beef mixture up to a day in advance and refrigerate it. Assemble the layers just before baking so the chips do not become soggy. Add a few extra minutes to the baking time if the components are cold from the refrigerator.
Can I freeze Mexican Loaded Taco Casserole? The baked casserole freezes reasonably well for up to 2 months if tightly wrapped. Thaw overnight in the refrigerator and reheat covered in the oven. For best texture, add fresh toppings after reheating. Freezing before baking is possible but the chips may soften more upon thawing and baking.
What can I use instead of a taco seasoning packet? A homemade blend of chili powder, cumin, paprika, garlic powder, onion powder, oregano, salt, and a pinch of cayenne works well. Use about 2–3 tablespoons total, adjusting to taste.
Can I make this vegetarian? Yes. Replace the ground beef with a plant-based ground alternative, or use a mixture of black beans, pinto beans, and corn. Season and simmer with the salsa the same way.
How do I keep the chips from getting too soggy? Use sturdy tortilla chips, crush them only lightly, and bake uncovered. Adding the chips in layers rather than mixing them into the beef helps preserve some texture.
Can I use a different type of cheese? Absolutely. Cheddar, Monterey Jack, pepper jack, or a combination all work. A Mexican blend is convenient and melts nicely, but any good melting cheese is fine.
Is this recipe spicy? As written, the heat level depends mainly on the salsa and the taco seasoning you choose. Use mild versions for a family-friendly result, or hot salsa and extra seasoning for more kick. Fresh toppings and sour cream help moderate the heat.
Conclusion
Mexican Loaded Taco Casserole transforms the beloved flavors of tacos into an easy, layered, oven-baked dinner that is both comforting and festive. Seasoned ground beef, crushed tortilla chips, sour cream, and abundant melted cheese create a rich, satisfying base, while the fresh tomatoes, green onions, and optional olives and cilantro added after baking keep the dish bright and colorful. The straightforward method—brown the beef, layer the components, bake until bubbly, and finish with fresh toppings—makes it accessible for any cook and ideal for busy nights or casual gatherings. Its popularity stems from convenience, bold flavor, and the way it feeds a crowd with minimal fuss. Once you have made it, this casserole is likely to become a regular request: it is hearty, cheesy, customizable, and consistently delicious. Serve it hot, scoop generously, and enjoy the satisfying combination of taco-inspired taste and classic casserole comfort in every bite.
Print
Mexican Loaded Taco Casserole
- Prep Time: 15 minutes
- Cook Time: 30 minutes
- Total Time: 45 minutes
- Category: Dinner
- Method: Baking
- Cuisine: American
Description
It’s an easy, crowd-pleasing comfort food packed with bold Mexican-inspired flavor!
Ingredients
- 1½ pounds ground beef (80/20 or 85/15 recommended for flavor and moisture)
- 1 small onion, diced
- 1 packet taco seasoning (or approximately 2–3 tablespoons homemade equivalent)
- 1 cup salsa (mild, medium, or hot according to preference)
- 1 cup sour cream (full-fat preferred for richness and stability)
- 3 cups shredded Mexican blend cheese (or a mix of cheddar and Monterey Jack)
- 4 cups tortilla chips, lightly crushed (enough for two layers)
- 1 cup diced tomatoes (fresh Roma or similar, seeds removed if very watery)
- ½ cup sliced green onions
- ½ cup sliced black olives (optional)
- ¼ cup chopped fresh cilantro (optional)
- Salt and black pepper, to taste
Instructions
Step 1 Preheat the oven to 375°F (190°C). Lightly grease a 9×13-inch baking dish with nonstick cooking spray or a thin film of oil. This prevents sticking and makes serving and cleanup easier. Set the dish aside while you prepare the filling. Ensuring the oven is fully heated before the casserole goes in promotes even melting of the cheese and thorough heating of the layers.
Step 2 Place a large skillet over medium-high heat. Add the ground beef and diced onion. Cook for 7 to 9 minutes, breaking the beef into small crumbles with a wooden spoon or spatula, until the beef is fully browned and no longer pink and the onion has softened and turned translucent. Carefully drain any excess grease, leaving just a small amount in the pan for flavor. Thorough browning develops deep savory notes that form the foundation of the casserole.
Step 3 Sprinkle the taco seasoning over the beef and onion mixture. Pour in the cup of salsa. Stir well to combine, then reduce the heat to medium and let the mixture simmer for 2 to 3 minutes. This short simmer allows the seasoning to bloom and the salsa to meld with the beef, creating a cohesive, flavorful filling. Taste and add a pinch of salt or black pepper only if needed. Remove the skillet from the heat once the mixture is well combined and slightly thickened.
Step 4 Spread approximately half of the lightly crushed tortilla chips in an even layer across the bottom of the prepared baking dish. The chips should cover the surface without large gaps; gentle crushing (not powder) preserves texture while allowing the chips to layer neatly.
Step 5 Spoon half of the seasoned beef mixture evenly over the chip layer. Dollop half of the sour cream across the beef in small spoonfuls, then gently spread it as evenly as possible. Sprinkle half of the shredded Mexican-blend cheese over the sour cream layer. These alternating layers of chips, beef, sour cream, and cheese create the signature loaded texture and flavor distribution.
Step 6 Repeat the layering process: add the remaining crushed tortilla chips, followed by the rest of the beef mixture, the remaining sour cream, and the final portion of shredded cheese. The top should be covered generously with cheese so it melts into a bubbly, golden blanket. Press down very lightly with a spatula if needed to settle the layers, but avoid compacting them too firmly.
Step 7 Place the uncovered casserole in the preheated oven and bake for 20 to 25 minutes. The exact time depends on your oven; look for the cheese to be completely melted, bubbly, and beginning to turn golden in spots, and for the edges of the casserole to show gentle bubbling. The chips will soften slightly where they contact the hot filling while retaining some structure.
Step 8 Carefully remove the casserole from the oven and let it rest for 5 minutes. This brief cooling period allows the layers to set slightly, making scooping cleaner and preventing the filling from being overly runny.
Step 9 Scatter the diced tomatoes, sliced green onions, optional black olives, and optional chopped cilantro evenly over the hot, melted cheese. Adding these fresh ingredients after baking keeps them crisp, bright, and colorful rather than cooked and muted. The contrast between the hot, cheesy casserole and the cool, fresh toppings is one of the dish’s best features.
Step 10 Serve the casserole warm, scooping down through all the layers so each portion includes chips, beef, sour cream, cheese, and fresh toppings. Offer extra salsa, sour cream, or hot sauce on the side for those who want additional customization.
Notes
Several details help ensure the best texture and flavor. Drain the ground beef well after browning to avoid a greasy casserole. Lightly crushing the tortilla chips (rather than pulverizing them) preserves some crunch while allowing them to layer evenly. Spreading the sour cream in dollops and then gently smoothing it prevents it from mixing completely into the beef, maintaining distinct creamy pockets. Baking uncovered allows excess moisture to evaporate and the cheese to brown properly. Adding the fresh toppings only after baking is essential for color, texture, and brightness—putting them on before baking causes the tomatoes and green onions to soften and lose their appeal. Resting the casserole for a few minutes after baking helps the layers hold together when scooped. If the top browns too quickly, you can loosely tent the dish with foil for the last few minutes. Finally, use a sturdy spatula or large spoon to serve so each portion includes a cross-section of all layers.
Nutrition
- Calories: 580
- Sugar: 5 g
- Sodium: 1300 mg
- Fat: 38 g
- Carbohydrates: 32 g
- Fiber: 4 g
- Protein: 34g