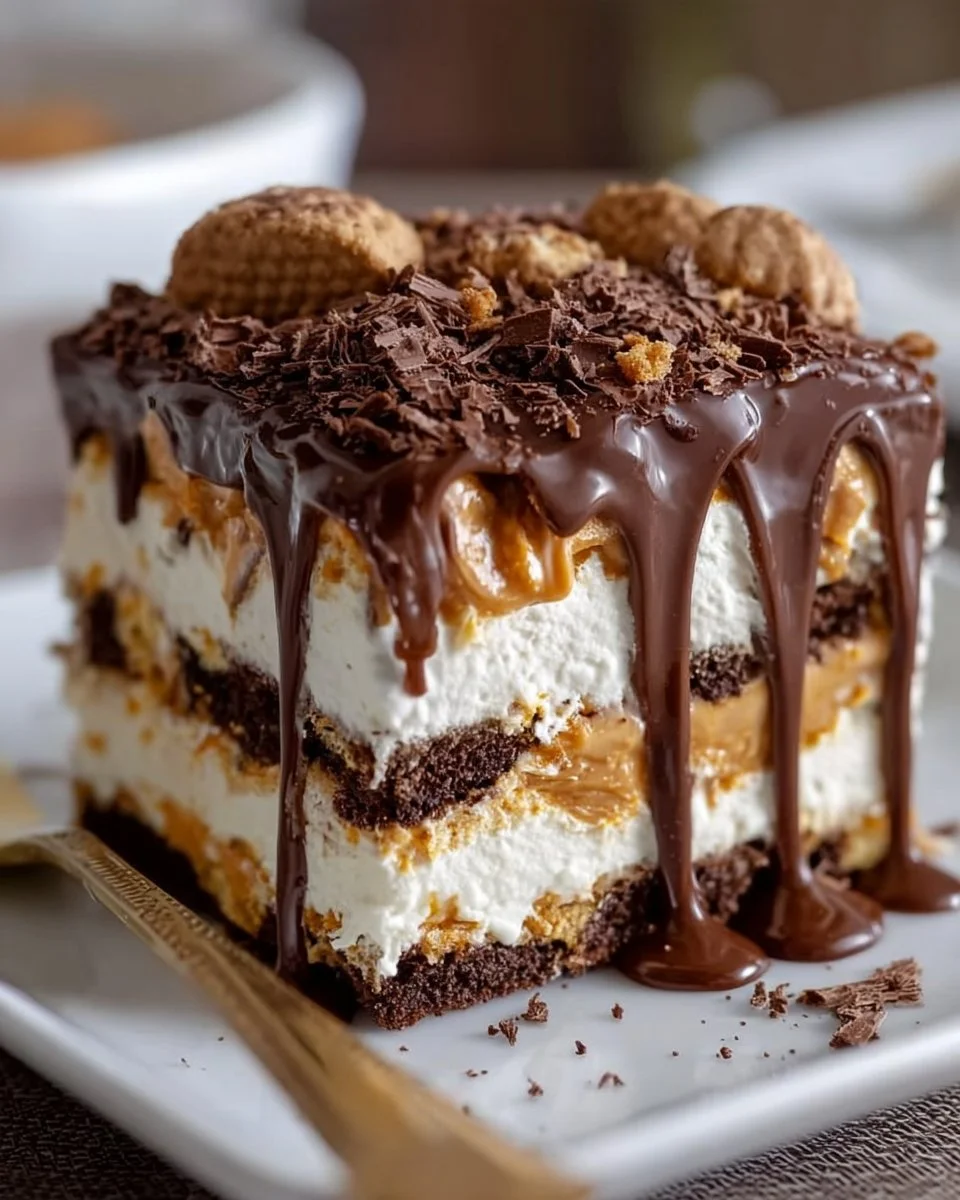
Indulging in a silky, cream-filled dessert that captures the essence of childhood memories feels, at times, like discovering a secret stash of happiness. Imagine sinking your spoon into layers of decadently smooth peanut butter intermixed with fluffy whipped cream, each bite a joyous celebration of creamy richness that melds perfectly with the delightful crunch of graham crackers. This Peanut Butter Icebox Cake transcends mere dessert status; it’s comfort food at its finest. The moment that chilled, velvety dessert touches your taste buds, a wave of nostalgia sweeps over you, promising schoolyard delights or cool summer evenings spent laughing with friends.
As it sits quietly in your refrigerator, waiting for the moment of its glorious unveiling, it beckons you with its creamy aroma, teasing your senses like a warm embrace. The golden layers interlace with richness and a hint of sweetness that dances on your palate, enveloping you in a delightful contrast of textures — the satisfying crunch of chewy graham crackers against the lush filling. Each bite tells a story, perfect for celebrating life’s small pleasures or simply making an ordinary day extraordinary.
Why You’ll Love This Peanut Butter Icebox Cake
This Peanut Butter Icebox Cake becomes an instant favorite, drawing people in with its simplicity, charm, and utterly delectable flavor profile. Made with just a handful of ingredients, it’s a treat that feels extravagant without demanding hours of effort in the kitchen. Perfect for gatherings, potlucks, or a special family dinner, this scrumptious cake requires no baking — it’s ready to impress with minimal fuss. The combination of creamy peanut butter and luxurious whipped cream elicits a rich, nutty aroma that wafts through the air, inviting everyone to indulge.
Imagine serving this masterpiece at a summer barbecue or a cozy movie night with friends. It’s the kind of dessert that leaves a lasting impression, with everyone clamoring for seconds. Not only is it easy to whip up, but it also delivers the kind of comforting taste that makes the heart sing. The combination of flavors and textures will leave your guests reminiscing about this dessert long after the last bite.
Preparation Phase & Tools to Use
Before diving into this delicious endeavor, gather your essential tools. You’ll need a few items to ensure a smooth preparation process, transforming your kitchen into a haven of sweet delight:
- Electric Mixer: Whipping cream to perfection requires the power of an electric mixer. This tool cuts down on effort while ensuring your cream reaches those soft peaks effortlessly, leading to a light airy texture in your cake.
- Mixing Bowls: Prepare for layering by having two large mixing bowls. One for the cream and another for the peanut butter mixture. This separation simplifies the process, allowing for easy folding and mixing.
- 9×13 Inch Dish: The perfect size to accommodate all those delicious layers. A glass dish showcases the beautiful stratification of creamy and crunchy components.
- Spatula: A good spatula helps smooth out layers and gently fold the whipped cream into the peanut butter without losing that lovely volume.
Preparation Tips
- Chill Your Whipping Bowl: For the fluffiest whipped cream, chill your mixing bowl in the freezer for about 10 minutes before whipping.
- Taste as You Go: Adjust sugar levels when mixing — you want that perfect balance of sweetness!
Ingredients for Peanut Butter Icebox Cake
Gather the following ingredients, each playing a vital role in this delightful dessert:
- Graham Crackers: These little squares lend a perfect crunch between layers while soaking up the delicious creamy filling. For a twist, try honey-flavored or chocolate graham crackers.
- Creamy Peanut Butter: Choose a high-quality, creamy peanut butter for the best results. You can also explore alternatives like almond or cashew butter for a unique flair.
- Heavy Cream: The star of the whipped layer, heavy cream creates a luxurious, frothy texture. Ensure it’s chilled for the best whipping results.
- Sugar: Sweetness is key. Use powdered sugar for a smoother blend into the whipped cream, giving you a silky finish.
- Vanilla Extract: This essential flavor enhancer brightens the entire dessert, making each bite even more delightful.
- Chocolate Shavings or Cocoa Powder (for garnish): A sprinkle of chocolate brings a touch of elegance and needed contrast to the peanut butter’s sweetness.
How to Make Peanut Butter Icebox Cake
- Whip the Cream: In a mixing bowl, whip the heavy cream with sugar and vanilla extract until soft peaks form. This process typically takes about 3-5 minutes; pay close attention to avoid over-whipping.
- Mix the Peanut Butter: In another bowl, mix the creamy peanut butter until smooth, ensuring it’s easy to fold into the whipped cream.
- Incorporate the Cream: Gently fold half of the whipped cream into the peanut butter mixture until combined. Let the rich flavors mingle without deflating your whipped cream.
- Layer the Dish: In the prepared 9×13 inch dish, spread a layer of the peanut butter mixture, smoothing it evenly across the bottom.
- Add Graham Crackers: Place a layer of graham crackers on top, covering the peanut butter layer completely.
- Repeat the Layers: Continue the process, alternating between the peanut butter mixture and graham crackers until all ingredients are used. End with a layer of whipped cream on top for a beautifully frosty finish.
- Chill: Cover with plastic wrap and refrigerate for at least 4 hours, or preferably overnight. This waiting period lets the graham crackers soften and soak in all that luscious filling.
- Garnish and Serve: Before serving, sprinkle chocolate shavings or cocoa powder on top, adding the perfect finishing touch of decadence.
Chef’s Notes & Helpful Tips
- Make-Ahead Tip: This cake stays fresh for a few days in the refrigerator, making it an ideal make-ahead dessert for parties or get-togethers.
- Cooking Alternatives: If you prefer an oven-baked version, layer similar ingredients in a springform pan and bake a traditional cheesecake.
- Customization Ideas: Get creative by adding layers of banana slices, crushed cookies, or drizzling caramel sauce between the layers. The possibilities are endless!
Common Mistakes to Avoid
- Over-Whipping Cream: Be cautious while whipping the cream—over-whipped cream can become grainy, changing the final texture. Aim for soft peaks that hold their shape.
- Not Giving Enough Chill Time: Allow time for the cake to set. Skipping the chilling period leaves you with a mushy mess rather than a perfectly layered cake.
- Ignoring Ingredient Quality: Don’t compromise on the quality of peanut butter or cream; better ingredients lead to a more indulgent tasting experience.
What to Serve With Peanut Butter Icebox Cake
Pairing this luscious cake with delightful accompaniments enhances its charm:
- Fresh Berries: Serve alongside strawberries or raspberries for a tart contrast that cuts through the richness.
- Vanilla Ice Cream: A scoop of creamy vanilla ice cream complements the flavors beautifully, creating a decadent dessert duo.
- Chocolate Drizzle: Drizzle melted chocolate or chocolate sauce on top for an extra indulgent touch.
- Espresso or Coffee: Pair a slice with a cup of espresso or coffee to highlight the nutty flavors of peanut butter.
- Whipped Cream: Top each slice with a dollop of freshly whipped cream for an extra creamy bite.
- Nutty Granola: Sprinkle granola for added texture and crunch when serving, delivering that beloved surprise element.
- Caramel Sauce: A drizzle adds richness, taking the deliciousness up another notch.
- Baked Apples: For a cozy touch, serve warm baked apples beside your cake, bringing warmth to the table.
Storage & Reheating Instructions
Store any leftovers in an airtight container in the refrigerator for up to 4 days — if it lasts that long! The flavors deepen over time, making it shockingly delicious even on the third day. If you’d like to keep it for longer, wrap tightly and freeze it for up to a month. When ready to indulge, let it thaw in the fridge overnight; it’ll remain just as delightful as the first serving.
Estimated Nutrition Information
Each slice of this Peanut Butter Icebox Cake (based on 12 servings) contains approximately:
- Calories: 320
- Total Fat: 20g
- Saturated Fat: 10g
- Carbohydrates: 30g
- Dietary Fiber: 1g
- Sugars: 15g
- Protein: 6g
Disclaimer: Values may vary based on specific ingredients used and serving sizes.
FAQs
1. Can I use natural peanut butter instead of creamy peanut butter?
Absolutely! However, natural peanut butter might be slightly more oily, so mix it thoroughly before adding it in. The final texture may differ slightly but will still be delicious.
2. How long should I chill the cake?
For best results, let it chill for at least 4 hours, but overnight is ideal. This time allows the graham crackers to soften and soak in all that creamy goodness.
3. Can I freeze the Peanut Butter Icebox Cake?
Yes! It freezes well, but be sure to wrap it tightly in plastic wrap and then in aluminum foil to avoid freezer burn. Thaw in the fridge before serving.
4. Can I replace heavy cream with a non-dairy alternative?
Certainly! Use full-fat coconut cream or a soy-based whipping cream as a great non-dairy substitute for the whipped layer.
5. What can I do with leftovers or scraps?
If you find yourself with extra graham crackers or filling, layer them in small dessert cups for individual treats. Leftover peanut butter filling also tastes fantastic spread on toast or something similar!
In the end, this Peanut Butter Icebox Cake is not just a dessert; it’s an experience waiting to happen. Its rich flavor and delightful texture create a moment of joy with every bite. So grab the ingredients and get started — your taste buds and those around you will forever thank you for this luscious treat!
Print
Peanut Butter Icebox Cake
- Prep Time: 15 minutes
- Cook Time: 0 minutes
- Total Time: 240 minutes
- Yield: 12 servings 1x
- Category: Dessert
- Method: No-Bake
- Cuisine: American
- Diet: Vegetarian
Description
A delightful no-bake dessert composed of creamy peanut butter and whipped cream layered with graham crackers, perfect for gatherings or family dinners.
Ingredients
- 2 cups Graham Crackers
- 1 cup Creamy Peanut Butter
- 2 cups Heavy Cream
- 1/2 cup Powdered Sugar
- 1 tsp Vanilla Extract
- Chocolate Shavings or Cocoa Powder (for garnish)
Instructions
- Whip the cream: In a mixing bowl, whip the heavy cream with sugar and vanilla extract until soft peaks form.
- Mix the peanut butter in another bowl until smooth.
- Incorporate half of the whipped cream into the peanut butter mixture until combined.
- Layer the peanut butter mixture in a 9×13 inch dish.
- Add a layer of graham crackers on top.
- Repeat the process until all ingredients are used, ending with a layer of whipped cream on top.
- Chill for at least 4 hours or overnight.
- Garnish and serve with chocolate shavings or cocoa powder.
Notes
Make-Ahead: The cake stays fresh for a few days in the refrigerator. Over-whipping the cream can affect the texture, so be careful.
Nutrition
- Serving Size: 1 slice
- Calories: 320
- Sugar: 15g
- Sodium: 150mg
- Fat: 20g
- Saturated Fat: 10g
- Unsaturated Fat: 6g
- Trans Fat: 0g
- Carbohydrates: 30g
- Fiber: 1g
- Protein: 6g
- Cholesterol: 30mg