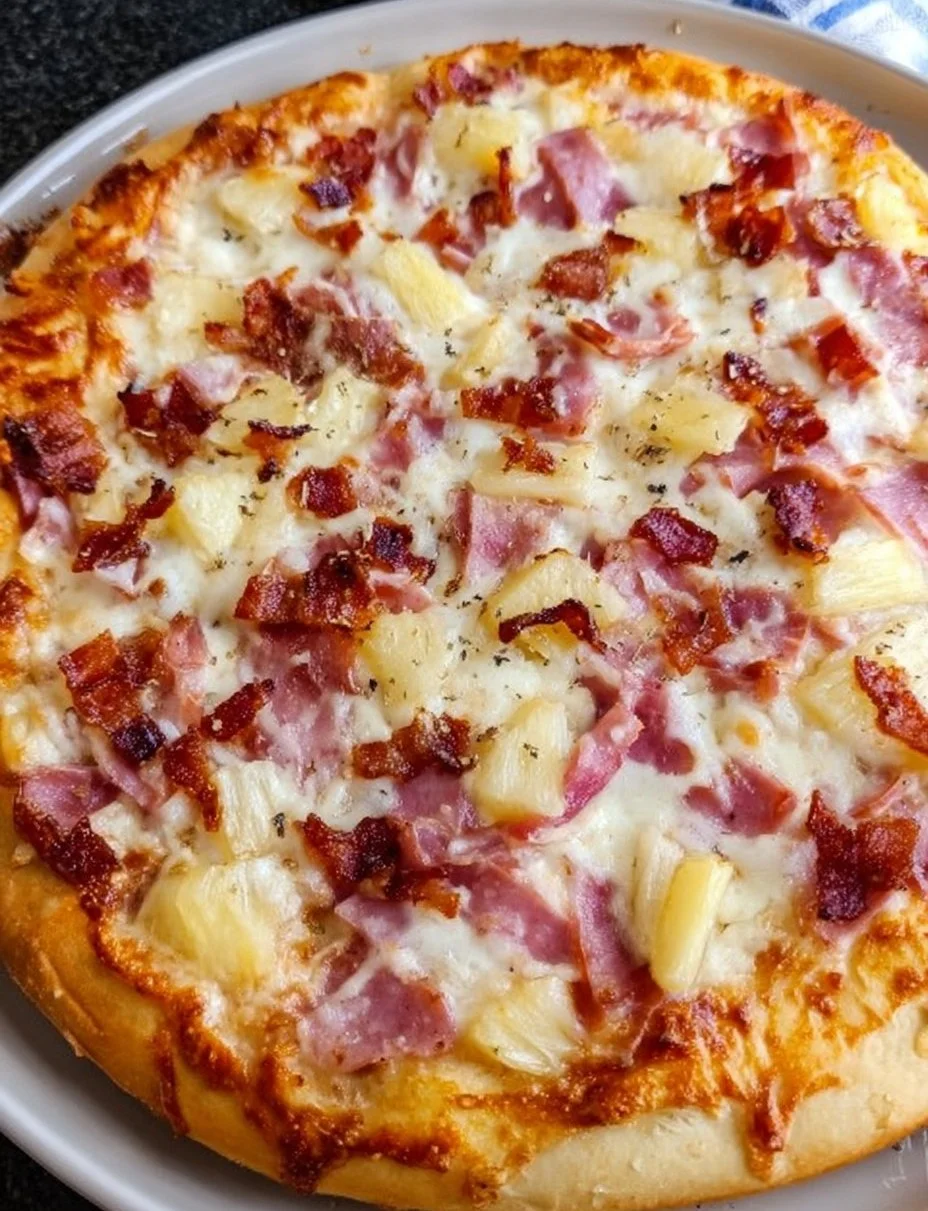
Imagine a bustling kitchen filled with the tantalizing aroma of melted cheese mingling with the sweet tang of ripe pineapple. Each savory bite of Hawaiian pizza dances on your palate, a harmonious blend of flavors that transports you to sun-soaked beaches and laid-back island vibes. The crunch of the golden crust under your teeth contrasts beautifully with the juiciness of succulent pineapple chunks and the savory depth of crispy bacon. This isn’t just a meal; it’s a celebration on a plate, evoking memories of warm evenings and laughter shared over good food.
It’s no wonder Hawaiian pizza has found its way into the hearts—and stomachs—of so many. Sweet, savory, and irresistibly delicious, it brings together the comforting warmth of cheese with a tropical twist that keeps you coming back for more. Whether you whip it up for a casual weeknight dinner or serve it at a festive gathering, this pizza promises to steal the spotlight. Each slice invites you to revel in its delightful contrasts, making it a dish that feels both familiar and exciting, soothing yet adventure-filled.
Why You’ll Love This Hawaiian Pizza
The allure of Hawaiian pizza lies in its divine marriage of flavors. Picture a crust that shatters delightfully with each bite, yielding to a blanket of gooey, melted mozzarella. Add in what can only be described as the perfect sprinkle of sweet pineapple and savory ham, punctuated by the delightful crunch of crispy bacon. Together, these ingredients create a symphony of taste that is both unexpected and completely satisfying.
Not only is this dish a joy to eat, but it’s also incredibly versatile. You can serve it on game day, host a pizza night with friends, or simply indulge in it after a long day. The bright and fruity elements of the pineapple brighten up any meal, while the hearty ham and bacon make it feel indulgent. Plus, you can easily customize it to suit various dietary preferences, ensuring it pleases a crowd. All of this makes Hawaiian pizza stand out as a beloved favorite among pizza aficionados.
Preparation Phase & Tools to Use
Preparing Hawaiian pizza isn’t just about following a recipe; it’s about creating an experience. Having the right tools makes all the difference. Here’s what you’ll need:
-
Pizza Stone or Baking Sheet: A pizza stone provides that legendary crispy crust that we all love, trapping heat and moisture effectively. If you don’t have one, a baking sheet works just fine—just be sure to preheat it!
-
Rolling Pin: A good rolling pin is essential for achieving the perfect thickness of your crust. Who doesn’t love a pizza that’s just the right amount of chewiness?
-
Pizza Cutter: For clean, precise slices that show off your delicious creation, a pizza cutter is an essential tool.
Preparation Tips:
- Flour your surface generously to prevent sticking while rolling out the dough.
- Prep your ingredients ahead of time, so assembling your pizza becomes a breeze.
Ingredients for Hawaiian Pizza
- 1 pizza crust: You can use store-bought or homemade. Opt for thin crust if you love a crispy bite or thick crust for softness.
- 1/2 cup pizza sauce: Choose a marinara or pizza sauce that suits your taste—there are even BBQ sauces for a smoky twist.
- 1 1/2 cups shredded mozzarella cheese: This classic cheese guarantees a gooey, stretchy texture.
- 1 cup diced ham: A salty and savory staple; feel free to try turkey ham for a lighter option.
- 1 cup pineapple chunks: Fresh pineapple offers unparalleled sweetness, but canned works too—just drain it well.
- 1/2 cup cooked bacon, crumbled: The smoky crunch adds a delicious contrast to the softer ingredients.
- 1 teaspoon olive oil & 1 teaspoon dried oregano: These add a touch of richness and Italian flair, enhancing the overall flavor.
How to Make Hawaiian Pizza
Creating your Hawaiian pizza is a delightful adventure! Follow these easy steps to craft your own slice of paradise:
-
Preheat your oven to 475°F (245°C) so it reaches the perfect temperature for that superb crust.
-
On a floured surface, roll out your pizza crust to your desired thickness. This is the foundation, so make sure it’s just how you like it!
-
Carefully place the rolled crust on your preheated pizza stone or a baking sheet, ensuring it’s well positioned.
-
Spread the pizza sauce evenly over the crust. Try not to overdo it—too much sauce can make the crust soggy!
-
Generously sprinkle the shredded mozzarella cheese over the sauce, creating a cheesy haven.
-
Scatter the diced ham, pineapple chunks, and crumbled bacon evenly on top of the cheese, ensuring every slice gets a bit of that tropical goodness.
-
Drizzle a teaspoon of olive oil over the toppings and finish with a sprinkle of dried oregano to add depth of flavor.
-
Bake in your preheated oven for 12-15 minutes. Watch closely! The crust should turn golden brown, and the cheese should bubble enticingly.
-
Once baked, allow the pizza to cool slightly, slice, and savor the warmth.
Chef’s Notes & Helpful Tips
Make-Ahead Tips
- Pizza Dough: Prepare your dough ahead of time, wrap it tightly, and refrigerate it the night before.
- Prepped Ingredients: Chop your veggies and toppings in advance to cut down on prep time.
Cooking Alternatives
- Air Fryer: Use an air fryer for mini pizzas. Just adjust cooking time, usually around 8-10 minutes at 400°F (200°C).
- Grill: For a smoky twist, you can grill your pizza. Just ensure the crust is well-oiled and grill it covered.
Customization Ideas
- Replace traditional cheese with a blend of cheddar and gouda for a unique flavor.
- Add jalapeños for a spicy kick, or swap out ham for prosciutto.
Common Mistakes to Avoid
One common mistake lies in the oven temperature. Too low, and your pizza may turn out soggy; too high without monitoring can burn toppings before the crust has cooked. Ensure you have a reliable oven thermometer for perfect results.
Another pitfall is skimping on the toppings—each bite should burst with flavor! Also, allow your pizza to cool slightly before slicing to maintain the structure of your toppings.
What to Serve With Hawaiian Pizza
Pair this delicious creation with simple, complementary dishes that elevate your meal:
- Mixed Green Salad: A crisp salad with light vinaigrette refreshes the palate.
- Garlic Bread: Toasty, buttery bites add a classic touch.
- Coleslaw: The creamy crunch of coleslaw balances the sweetness of the pizza beautifully.
- Fruit Salad: Enhance the tropical feel with a colorful assortment of fresh fruits.
- Craft Beer or Tropical Cocktails: A fruity beer or a piña colada can complement the sweet elements perfectly.
- Soda or Iced Tea: Classic beverages that pair well with pizza and balance its flavors.
Storage & Reheating Instructions
You can store leftover Hawaiian pizza in the fridge for 3-4 days. Wrap each slice in plastic wrap or aluminum foil to maintain freshness. If you want to keep it longer, freeze it! Slice the pizza, wrap it tightly, and store it in an airtight container for up to 2 months.
Reheating Methods
- Oven: Preheat to 350°F (175°C) and bake for about 10 minutes for crispy goodness.
- Microwave: Though quick, this method can make the crust chewy. Place a cup of water in the microwave with the pizza to keep the crust from drying out.
Estimated Nutrition Information
Approximate values per slice (1/8 of a pizza):
- Calories: 250
- Protein: 12g
- Carbohydrates: 29g
- Fat: 10g
Please note that nutrition values can vary based on ingredients and cooking methods.
FAQs
Can I make my own pizza sauce?
Absolutely! Simply blend tomatoes with garlic, herbs, and a touch of olive oil for a fresh, vibrant sauce.
Can I use fresh pineapple?
Yes! Fresh pineapple brings a bright flavor; just ensure it’s ripe and sweet for the best results.
What if my dough is sticky?
If your dough sticks, sprinkle a bit more flour on your work surface to manage it better, but avoid over-flouring as it might dry out the dough.
How do I know when the pizza is done?
Look for a crust that’s golden brown and cheese that’s bubbly and slightly browned on top. Occasionally, give it a gentle shake—the pizza should slide easily on the stone or sheet.
Can I add other toppings?
Feel free to get creative! Bell peppers, mushrooms, or even jalapeños can be delicious additions, just keep in mind the balance of flavors.
Conclusion
Making Hawaiian pizza at home undoubtedly transforms a simple gathering into a heartfelt celebration. Each bite brims with a vibrant tapestry of flavors that tell a story of sunny get-togethers and laughter shared around the table. The memories created over a homemade pizza are everlasting. So, gather your ingredients, fire up that oven, and embark on this culinary journey. You’ll not only satisfy your cravings but perhaps create a family favorite that makes frequent appearances at your dinner table. Go ahead, take that first bite, and let the magic of Hawaiian pizza whisk you away!
Print
Hawaiian Pizza
- Prep Time: 15 minutes
- Cook Time: 15 minutes
- Total Time: 30 minutes
- Yield: 8 slices 1x
- Category: Main Course
- Method: Baking
- Cuisine: Italian
- Diet: None
Description
Indulge in the sweet and savory delight of Hawaiian pizza, featuring melted mozzarella, juicy pineapple, and crispy bacon atop a perfectly baked crust.
Ingredients
- 1 pizza crust (store-bought or homemade)
- 1/2 cup pizza sauce (marinara or pizza sauce)
- 1 1/2 cups shredded mozzarella cheese
- 1 cup diced ham
- 1 cup pineapple chunks
- 1/2 cup cooked bacon, crumbled
- 1 teaspoon olive oil
- 1 teaspoon dried oregano
Instructions
- Preheat your oven to 475°F (245°C).
- Roll out your pizza crust on a floured surface to your desired thickness.
- Place the rolled crust on your preheated pizza stone or baking sheet.
- Spread the pizza sauce evenly over the crust.
- Sprinkle the shredded mozzarella cheese over the sauce.
- Scatter the diced ham, pineapple chunks, and crumbled bacon on top of the cheese.
- Drizzle olive oil over the toppings and sprinkle with dried oregano.
- Bake in the oven for 12-15 minutes until the crust is golden brown and the cheese is bubbling.
- Slice the pizza and serve warm.
Notes
For a unique twist, try using a blend of cheddar and gouda for the cheese, or add jalapeños for a spicy kick. Refrigerate any leftovers for 3-4 days.
Nutrition
- Serving Size: 1 slice
- Calories: 250
- Sugar: 4g
- Sodium: 600mg
- Fat: 10g
- Saturated Fat: 4g
- Unsaturated Fat: 5g
- Trans Fat: 0g
- Carbohydrates: 29g
- Fiber: 2g
- Protein: 12g
- Cholesterol: 30mg