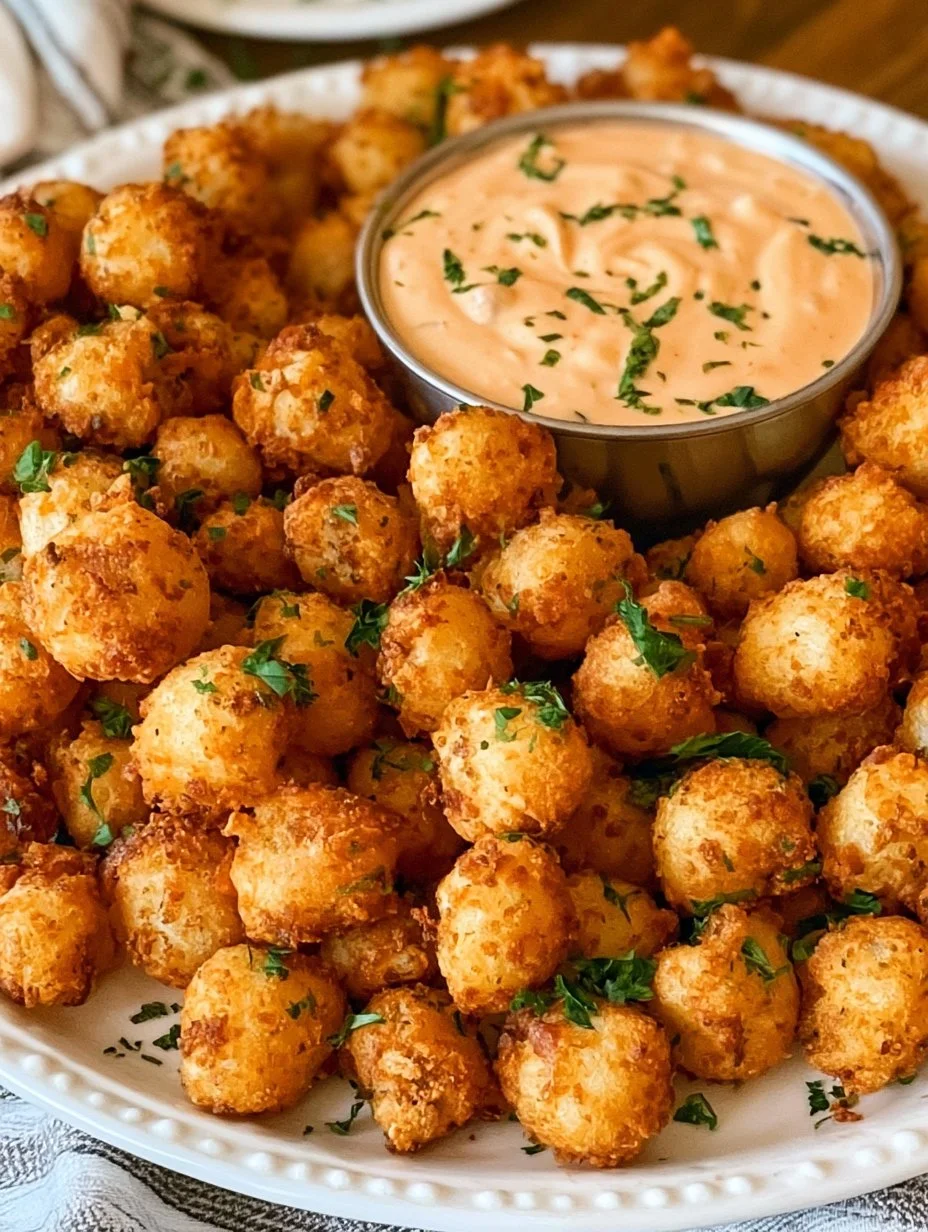
The aroma wafting through your kitchen, warm and inviting, fills the air with the promise of crispy, golden-brown delights. Picture this: bite-sized pieces of tender onion, enveloped in a crunchy, buttery coating that crisps perfectly with every bite. Each morsel bursts with flavor, a delightful fusion of garlic and paprika dancing on your taste buds, while a sumptuous comeback sauce awaits on the side, ready to elevate your dining experience from ordinary to extraordinary. These Bloomin’ Onion Bites are not just appetizers—they’re little bites of happiness.
Imagine sitting around the table with your loved ones, laughter echoing through the air, and little plates of these irresistible bites making their way around. They bring a sense of joy and togetherness, perfect for game nights, parties, or a cozy family dinner. As you indulge in their crunchy texture paired with the creaminess of the dipping sauce, you feel the stress of the day melt away. These flavor-packed bites become not just a dish but a centerpiece of joyous moments, connecting friends and family with every crunchy, flavorful bite.
Why You’ll Love This Bloomin’ Onion Bites
These Bloomin’ Onion Bites are a revelation for your taste buds, and here’s why you’ll fall head over heels for them. First, they deliver an unforgettable flavor experience. Each bite combines the sweetness of pearl onions with the savory punch of garlic and paprika, wrapped in a golden shell that’s satisfying to crunch into. Whether you enjoy them on game day, serve them at a summer barbecue, or bring them out for movie night, they will be the star of the show.
Additionally, these bites are incredibly versatile. They cater to all palates and can easily transform an ordinary gathering into an exciting culinary adventure. Not to mention, they’re a fantastic way to incorporate veggies into your fare while still satisfying that munchy craving for something crispy. Plus, they invite creativity, encouraging you to play with spices and sauces until you discover your own favorite version.
Preparation Phase & Tools to Use
Creating the perfect Bloomin’ Onion Bites requires a few essential tools that make the process smoother and more enjoyable.
- Deep Fryer or Deep Pan: A deep fryer allows for consistent and even heating, ensuring every bite receives that perfect golden exterior. If you lack a fryer, a deep pan can work just as well, as long as you keep the oil at the right temperature.
- Mixing Bowls: You’ll need three mixing bowls: one for flour, one for eggs, and one for breadcrumbs. This separation allows for an efficient assembly line and ensures even coating.
- Slotted Spoon or Tongs: Use a slotted spoon or tongs to safely place the bites into the hot oil—keeping a safe distance from splatters while ensuring even cooking.
Preparation Tips:
- Make sure to thoroughly pat dry your thawed pearl onions. Moisture prevents that splendid crispiness you crave.
- Prepare your breading station ahead of time; having your coatings in their respective bowls will streamline the dipping process.
Ingredients for Bloomin’ Onion Bites
Gathering the right ingredients for your Bloomin’ Onion Bites is key to achieving that mouthwatering flavor profile. Here’s what you need:
- 1 bag frozen pearl onions
- 1 cup all-purpose flour
- 1 cup breadcrumbs
- 2 eggs
- 1 tsp garlic powder
- 1 tsp paprika
- Salt and pepper to taste
- Oil for frying
For the comeback sauce:
- 1/2 cup mayonnaise
- 1/4 cup ketchup
- 1 tbsp Worcestershire sauce
- 1 tsp hot sauce
Key Ingredients Explained:
- Frozen Pearl Onions: These tiny treasures have a sweet flavor and a tender texture that works beautifully when fried.
- Breadcrumbs: Use panko for an extra crunch, or regular breadcrumbs if you prefer a finer texture.
- Spices: Garlic powder and paprika create a beautiful depth of flavor that complements the sweetness of the onions.
- Mayonnaise: It adds rich creaminess to your comeback sauce, balancing well with the heat from the ketchup and hot sauce.
How to Make Bloomin’ Onion Bites
Creating Bloomin’ Onion Bites is easier than it seems! Follow these steps for delicious results:
- Begin by thawing the frozen pearl onions. Once thawed, place them between paper towels and gently pat them dry to remove excess moisture.
- In a medium bowl, combine the flour, garlic powder, paprika, salt, and pepper. Blend them together until well mixed.
- In another bowl, whisk the eggs until smooth and frothy, allowing them to coat the onions perfectly.
- Prepare the third bowl with the breadcrumbs, making sure it’s ready for the final crunch.
- Take each dried pearl onion, dip it into the flour mixture, ensuring it’s well-coated. Shake off any excess flour, then roll it in the eggs, allowing the excess to drip off before rolling it in the breadcrumbs. Press gently to ensure the breadcrumbs adhere nicely.
- In a deep fryer or deep pan, heat oil until it reaches 350°F. Test the temperature by dropping in a small piece of breadcrumb; it should sizzle and rise to the surface immediately.
- Carefully place the coated onions in the hot oil, being cautious not to overcrowd them. Fry them until they turn golden brown, which usually takes about 4-5 minutes.
- While frying, prepare the comeback sauce by mixing together the mayonnaise, ketchup, Worcestershire sauce, and hot sauce in a bowl. Adjust the hot sauce to suit your taste.
- Serve the bites warm alongside the creamy, spicy comeback sauce.
Chef’s Notes & Helpful Tips
- Make-Ahead Tips: You can prepare the onion bites ahead of time by breading them in advance and keeping them refrigerated for a couple of hours. Just fry them right before serving.
- Cooking Alternatives: If you want to avoid frying, try baking them in a preheated oven at 425°F. Place the breaded onions on a baking sheet lined with parchment paper. Spray lightly with cooking spray and bake for about 20 minutes, flipping halfway through until golden and crispy.
- Customization Ideas: Get adventurous! Incorporate different spices like cumin or cayenne for extra heat. You can also experiment with various dipping sauces, such as ranch or garlic aioli, to find your perfect match.
Common Mistakes to Avoid
- Overcrowding the Pan: Frying too many at once reduces the oil temperature, resulting in soggy and greasy bites. Fry in batches for that ideal crispiness.
- Not Patting Dry: Skipping the drying step on the thawed onions leads to moisture trapping inside the coating, ruining the crisp texture.
- Ignoring Oil Temperature: Frying at the wrong temperature can burn the outside while leaving the inside undercooked. Using a thermometer ensures you maintain the perfect heat.
What to Serve With Bloomin’ Onion Bites
Pairing these delectable Bloomin’ Onion Bites with the right accompaniments takes your dish to new heights. Consider serving alongside:
- Crisp, fresh salads for a refreshing counterbalance to the richness of the bites.
- A zesty salsa or guacamole, enhancing the flavor and adding an extra layer of interest.
- Piled high on a platter with crispy potato skins or loaded nachos for a superb game-day spread.
- Spicy chicken wings, creating an appetizing combination for gatherings with friends.
- Mini sliders that allow for delightful bites of flavor alongside your onion bites.
- A creamy dill dip or tzatziki for a delicious contrast to the crunchiness.
- Roasted vegetables to bring some color and nutritious balance to your table.
Storage & Reheating Instructions
If you happen to have leftovers—or dare we say, if you plan ahead—you can store Bloomin’ Onion Bites effectively. Place them in an airtight container and refrigerate for up to three days. To reheat, simply pop them in the oven at 375°F for about 10-15 minutes, or until heated through and crispy again. For an even quicker option, you can reheat in an air fryer for about 5 minutes to get that perfect crunch back.
Estimated Nutrition Information
Approximate values per serving (four bites):
- Calories: 300
- Total Fat: 18g
- Saturated Fat: 4g
- Cholesterol: 80mg
- Sodium: 450mg
- Total Carbohydrates: 30g
- Dietary Fiber: 1g
- Sugars: 1g
- Protein: 6g
Disclaimer: Nutritional information will vary based on exact ingredients and portion sizes.
FAQs
1. Can I use fresh onions instead of frozen pearl onions?
Yes, you can certainly use fresh onions. Cut them into similar-sized pieces; however, cooking times may vary slightly.
2. Can I make these bites gluten-free?
Absolutely! Substitute all-purpose flour with a gluten-free blend, and choose gluten-free breadcrumbs for a delicious alternative.
3. What’s the best type of oil to use for frying?
Opt for oils with high smoke points, such as vegetable oil, canola oil, or peanut oil for perfect frying.
4. How can I make these bites spicier?
Add additional hot sauce to both the dipping sauce and spice mixture, or incorporate spices like cayenne pepper into the breadcrumb coating.
5. Can I freeze the cooked Bloomin’ Onion Bites?
Yes, you can! After frying and cooling, place them in an airtight container. They freeze well for up to a month. Reheat from frozen in the oven or air fryer.
Conclusion
These Bloomin’ Onion Bites promise to transform any gathering into a taste sensation. The joy of sharing crispy, flavorful bites with family and friends creates lasting memories—ones that linger even after the last bite has been savored. So roll up your sleeves, gather your ingredients, and embark on a culinary adventure that will leave you and your guests craving more. Dive into the crunch, embrace the flavor, and let these little wonders take center stage on your table. Enjoy the warmth of creation, the delight of sharing, and the deliciousness of every single bite!
Print
Bloomin’ Onion Bites
- Prep Time: 15 minutes
- Cook Time: 20 minutes
- Total Time: 35 minutes
- Yield: 4 servings 1x
- Category: Appetizer
- Method: Frying
- Cuisine: American
- Diet: Vegetarian
Description
Delicious bites of pearl onions wrapped in a crunchy, buttery coating, served with a creamy comeback sauce.
Ingredients
- 1 bag frozen pearl onions
- 1 cup all-purpose flour
- 1 cup breadcrumbs
- 2 eggs
- 1 tsp garlic powder
- 1 tsp paprika
- Salt and pepper to taste
- Oil for frying
- For the comeback sauce:
- 1/2 cup mayonnaise
- 1/4 cup ketchup
- 1 tbsp Worcestershire sauce
- 1 tsp hot sauce
Instructions
- Thaw the frozen pearl onions. Once thawed, pat them dry with paper towels to remove excess moisture.
- Combine the flour, garlic powder, paprika, salt, and pepper in a medium bowl.
- Whisk the eggs in another bowl until smooth and frothy.
- Prepare the breadcrumbs in a third bowl for coating.
- Dip each dried pearl onion in the flour mixture, ensuring an even coating. Shake off excess flour.
- Roll the onions in the eggs, allowing excess to drip off, then coat in breadcrumbs.
- Heat oil in a deep fryer or deep pan to 350°F.
- Carefully place the coated onions in the hot oil and fry until golden brown, about 4-5 minutes.
- Mix the mayonnaise, ketchup, Worcestershire sauce, and hot sauce to prepare the comeback sauce.
- Serve the bites warm alongside the comeback sauce.
Notes
Make ahead by breading the onion bites and refrigerating for a couple of hours before frying. For a healthier alternative, try baking them at 425°F for about 20 minutes.
Nutrition
- Serving Size: 4 bites
- Calories: 300
- Sugar: 1g
- Sodium: 450mg
- Fat: 18g
- Saturated Fat: 4g
- Unsaturated Fat: 10g
- Trans Fat: 0g
- Carbohydrates: 30g
- Fiber: 1g
- Protein: 6g
- Cholesterol: 80mg