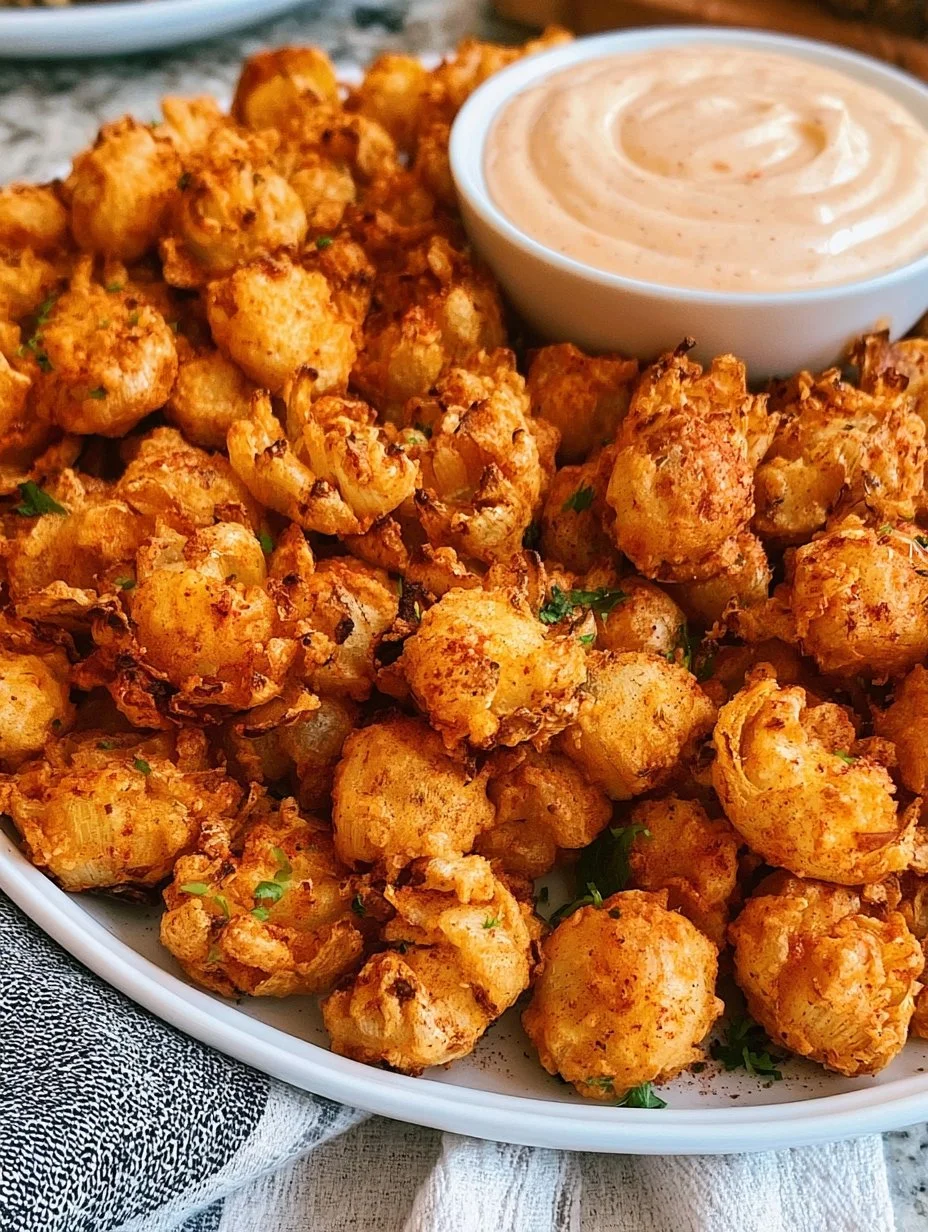
The moment you take that first bite, it’s an explosion of flavor and crunch that awakens your senses. Picture this: golden-brown, crispy batter envelops juicy, sweet pearl onions. The savory aroma wafts through the air, drawing everyone in. Each bite offers a perfect balance of textures—the crispy exterior gives way to the succulent, tender onion within, creating a delightful crunch that lingers on your palate. As you dip those delicious morsels into creamy comeback sauce, the tangy, slightly spicy flavor enhances the sweetness of the onions, creating an irresistible harmony of taste.
These Bloomin’ Onion Bites do more than satisfy your cravings—they become the highlight of any gathering. Perfect as a snack for game day or an appetizer at a dinner party, they offer a fun and interactive way to indulge with family and friends. Each bite feels like a celebration, and soon enough, they’ll become a must-have at your table, making every occasion a little brighter and a lot more delicious.
Why You’ll Love This Recipe
Imagine serving up a dish that not only looks beautiful but sounds irresistible too. Bloomin’ Onion Bites are just that—an eye-catching treat overflowing with incredible flavors that capture everyone’s attention. If you love how comforting a classic onion ring can be but crave a unique twist, this recipe takes that familiar pleasure to unexpected heights. The robust spices infuse each pearl onion with rich flavor, while the crispy breading forms a delightful coat that keeps the juicy goodness inside.
These bites are versatile, making them ideal for various occasions. Whether it’s a cozy night in, a lively barbecue, or holiday gatherings, they steal the spotlight every time. They cater to both the casual snacker and the discerning foodie alike. Plus, they’re simple to whip up at home, allowing you to enjoy restaurant-quality appetizers without breaking the bank.
Preparation Phase & Tools to Use
To create the most delicious Bloomin’ Onion Bites, you’ll want to gather a few essential tools that streamline your cooking experience.
- Deep frying pan: This is crucial for achieving that perfect golden-brown color and crispy texture. A heavy-bottom pan distributes heat evenly, preventing any oily disasters.
- Tongs: These allow you to maneuver the hot onion bites easily, ensuring they stay intact while frying.
- Mixing bowls: You’ll need these for preparing the coating and dredging the onions.
- Paper towels: Keep these handy to absorb excess oil once your delicious bites are ready.
Preparation tips? Make sure your oil is hot enough before frying—this ensures a crispy coating rather than a soggy mess. Test with a small piece of bread; if it sizzles, you’re good to go!
Ingredients for Bloomin’ Onion Bites
- 1 bag frozen pearl onions
- 1 cup all-purpose flour
- 1 cup breadcrumbs
- 1 teaspoon paprika
- 1 teaspoon garlic powder
- 1 teaspoon onion powder
- Salt and pepper to taste
- Oil for frying
- Comeback sauce (for serving)
The beauty of this recipe lies in its simplicity. Frozen pearl onions bring convenience without compromising flavor. The breadcrumb coating lends that delightful crunch, while the spices elevate the taste profile. Don’t hesitate to experiment! You can replace the paprika with cayenne for added heat, or try whole wheat flour for a healthier twist.
How to Make Bloomin’ Onion Bites
-
Heat the oil: In a deep frying pan, pour enough oil to fill about 2-3 inches, heating it over medium heat until it reaches 350°F. Use a thermometer for accuracy.
-
Prepare the coating: In a mixing bowl, combine flour, paprika, garlic powder, onion powder, salt, and pepper. Stir until evenly mixed.
-
Dredge the onions: Take the frozen pearl onions straight from the bag—there’s no need to defrost. Dredge them in the flour mixture, covering all sides thoroughly.
-
Coat with breadcrumbs: Once coated in the flour mixture, transfer the onions into a separate bowl of breadcrumbs. Ensure each one is well-coated, providing that signature crunch.
-
Fry to perfection: Carefully place a few coated onions into the hot oil. Fry until golden brown and crispy, approximately 3-4 minutes on each side.
-
Drain excess oil: Once cooked, use tongs to transfer the bites to a plate lined with paper towels to absorb any excess oil.
-
Serve hot: These treats are best enjoyed fresh. Serve them immediately with a side of rich, tangy comeback sauce for dipping.
Chef’s Notes & Helpful Tips
- Make-ahead tips: You can prepare the coating in advance and keep it in the refrigerator. Dredge the onions just before frying for the best results.
- Cooking alternatives: If you prefer less oil, feel free to use an air fryer or bake the bites in a preheated oven at 400°F for about 15-20 minutes, flipping halfway to ensure even cooking.
- Customization ideas: Add your favorite spices to the flour mixture, or toss in some grated Parmesan cheese for a richer flavor.
Common Mistakes to Avoid
It’s easy to make a few missteps when creating these delicious bites.
- Overcrowding the pan: Avoid adding too many onion bites at once as it can lower the oil temperature, leading to soggy rather than crispy results.
- Not drying the onions: If using fresh onions, ensure they are dry before applying your coating to help it adhere better.
- Insufficient oil temperature: If your oil isn’t hot enough, the bites will absorb too much oil, making them greasy.
What to Serve With Bloomin’ Onion Bites
These scrumptious bites pair beautifully with various dishes, making them a fantastic addition to any meal. Consider serving them with:
- Burgers: Their crunchy texture complements juicy patties perfectly.
- Grilled meats: They add a playful twist to barbecued chicken or steak.
- Salads: A fresh garden salad balances their richness beautifully.
- Craft beer: The slight bitterness of hoppy brews pairs well with the savory bites.
- Wine: A crisp white or fruity rosé makes for a refreshing complement.
- Vegetable dips: Hummus or salsa provide a zesty contrast.
- Tacos: They add crunch and flavor alongside spicy fillings.
Storage & Reheating Instructions
To keep your Bloomin’ Onion Bites fresh, store them in an airtight container in the fridge for up to three days. For longer storage, freeze them in a single layer on a baking sheet before transferring to a freezer-safe bag—this prevents them from sticking together. When you’re ready to enjoy them again, reheat in an air fryer or oven at 375°F for about 10-15 minutes until crispy.
Estimated Nutrition Information
(Approximate values per serving, depending on portion size and preparation method.)
- Calories: 250
- Total Fat: 14g
- Saturated Fat: 2g
- Cholesterol: 12mg
- Sodium: 300mg
- Carbohydrates: 30g
- Dietary Fiber: 2g
- Sugars: 1g
- Protein: 5g
Please note that nutrition information can vary based on specific ingredients and portion sizes.
FAQs
Q: Can I use fresh onions instead of frozen?
A: Absolutely! However, you will need to cut and parboil them first to ensure they cook through properly when fried.
Q: What is comeback sauce?
A: Comeback sauce is a creamy, tangy condiment, often made with mayonnaise, ketchup, and various spices. It enhances these bites beautifully.
Q: Can I bake these bites instead of frying?
A: Yes! Baking is a great alternative for a lighter version. Just preheat your oven to 400°F and bake for 15-20 minutes, flipping halfway through for even crispiness.
Q: How do I know when the oil is hot enough?
A: Use a thermometer to reach 350°F, or drop in a small piece of bread. If it sizzles vigorously, your oil is ready!
Q: Are these suitable for a vegan diet?
A: For a vegan option, substitute the comeback sauce with a plant-based dip and ensure your breading ingredients are vegan-friendly.
Conclusion
With each crispy, golden bite of these Bloomin’ Onion Bites, you’ll find yourself falling deeper for this delightful dish. They encapsulate everything you desire in a perfect appetizer—flavor, crunch, and a touch of fun. So gather your ingredients, fire up that frying pan, and let the aroma fill your home as you indulge in this tasty treat. Your friends and family will thank you as these little bites of joy disappear before your eyes. Start your culinary adventure now, and savor every delicious moment!
Print
Bloomin’ Onion Bites
- Prep Time: 15 minutes
- Cook Time: 15 minutes
- Total Time: 30 minutes
- Yield: 4 servings 1x
- Category: Appetizer
- Method: Frying
- Cuisine: American
- Diet: Vegetarian
Description
Delightful bites of frozen pearl onions coated in a crispy breading, perfect for dipping in creamy comeback sauce.
Ingredients
- 1 bag frozen pearl onions
- 1 cup all-purpose flour
- 1 cup breadcrumbs
- 1 teaspoon paprika
- 1 teaspoon garlic powder
- 1 teaspoon onion powder
- Salt and pepper to taste
- Oil for frying
- Comeback sauce (for serving)
Instructions
- Heat the oil: In a deep frying pan, pour enough oil to fill about 2-3 inches, heating it over medium heat until it reaches 350°F.
- Prepare the coating: In a mixing bowl, combine flour, paprika, garlic powder, onion powder, salt, and pepper. Stir until evenly mixed.
- Dredge the onions: Take the frozen pearl onions straight from the bag—there’s no need to defrost. Dredge them in the flour mixture, covering all sides thoroughly.
- Coat with breadcrumbs: Once coated in the flour mixture, transfer the onions into a separate bowl of breadcrumbs. Ensure each one is well-coated.
- Fry to perfection: Carefully place a few coated onions into the hot oil. Fry until golden brown and crispy, approximately 3-4 minutes on each side.
- Drain excess oil: Once cooked, use tongs to transfer the bites to a plate lined with paper towels to absorb any excess oil.
- Serve hot: Enjoy fresh with a side of rich, tangy comeback sauce for dipping.
Notes
You can prepare the coating in advance and keep it in the refrigerator. Dredge the onions just before frying for best results. Feel free to use an air fryer or bake in a preheated oven for a lighter version.
Nutrition
- Serving Size: 1 serving
- Calories: 250
- Sugar: 1g
- Sodium: 300mg
- Fat: 14g
- Saturated Fat: 2g
- Unsaturated Fat: 12g
- Trans Fat: 0g
- Carbohydrates: 30g
- Fiber: 2g
- Protein: 5g
- Cholesterol: 12mg