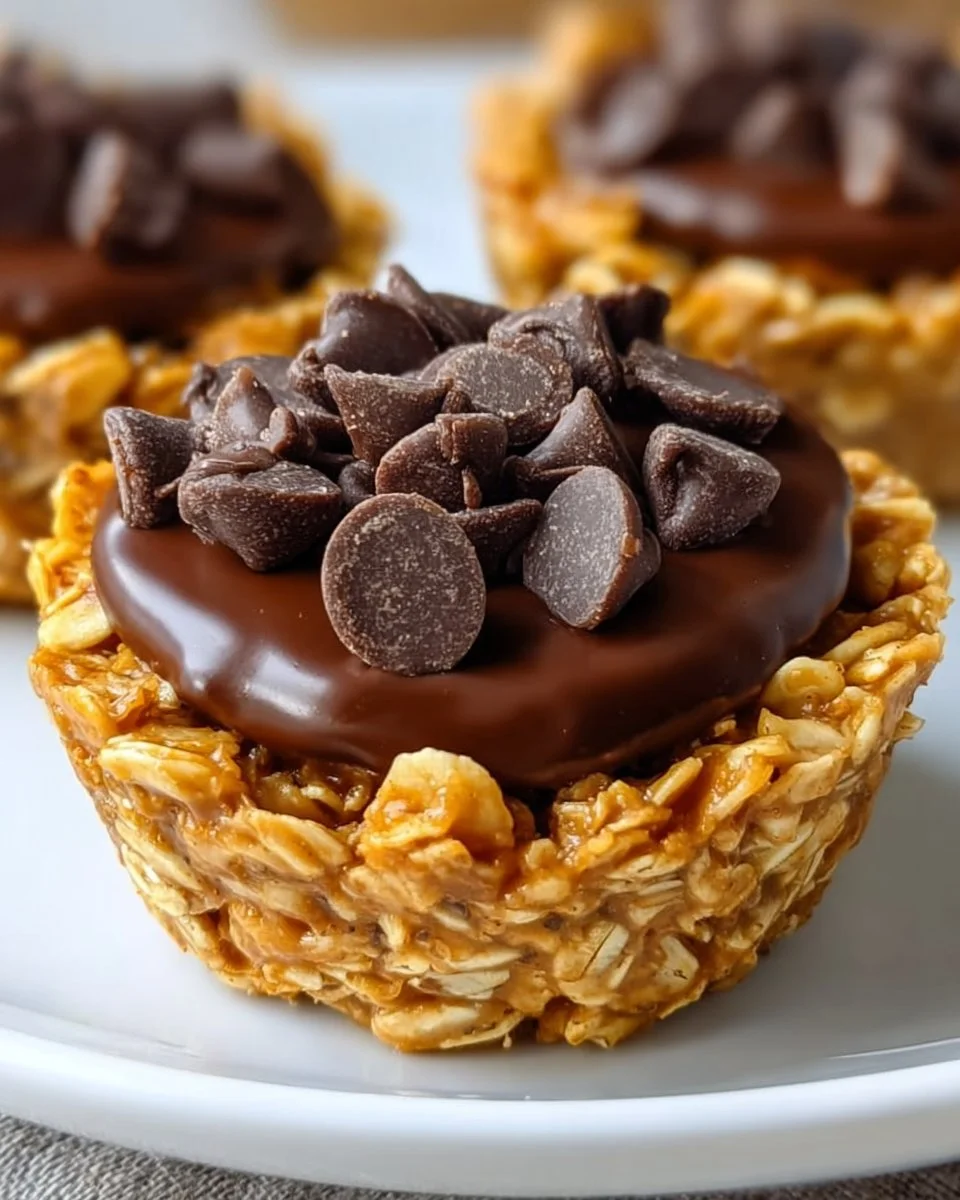
There’s something undeniably comforting about the sweet, nutty aroma that wafts through the kitchen, evoking memories of shared moments and guilty pleasures. Imagine small, golden brown cups cradling the essence of creamy peanut butter, a whisper of honey, and a delightful crunch that makes each bite an indulgent experience. These No Bake Peanut Butter Granola Cups become more than just a snack; they transform into treasure chests of flavor, each morsel packed with warmth and heartiness. As you prepare these adorable bites, your kitchen fills with the rich scent of roasted peanuts, luring you closer to the tantalizing treat that awaits.
Picture the moment you take a bite. Your teeth sink into the sweet, slightly chewy composition of oats and crunchy granola, releasing an explosion of nutty delight. The rich, creamy texture of peanut butter mingles with a hint of sweetness, while the chocolate chips melt slightly in your mouth, adding a perfect finishing note to balance the wholesome goodness. Each cup pierces that nagging craving for something sweet yet nourishing, making them perfect for breakfast on the go, afternoon pick-me-ups, or even a late-night treat that won’t leave you feeling guilty.
Why You’ll Love This No Bake Peanut Butter Granola Cups
These No Bake Peanut Butter Granola Cups become your go-to recipe for so many reasons. They are effortlessly simple, requiring no oven or complicated techniques, making them perfect for even the novice home cook. The combination of flavors and textures creates a harmony that speaks to both kids and adults alike, ensuring they become everyone’s favorite snack. They fit seamlessly into hectic schedules, allowing you to meal prep ahead of time or whip them together when a sudden craving strikes, fulfilling that need for something delicious and wholesome.
These granola cups not only satisfy your taste buds but also emit an aura of nostalgia, reminiscent of lazy afternoons spent snacking with friends or cozy evenings by the fire, indulging in sweet treats with loved ones. Whether you share them at a picnic or enjoy them quietly as a little snack, they stand out as an inviting answer to that sweet tooth yearning.
Preparation Phase & Tools to Use
Getting ready to create these delightful little treats calls for a few key tools that will ensure success. Gather these essentials to streamline your process:
- Mixing Bowl: A sturdy bowl allows you to combine all the ingredients without any mess, providing enough space to mix everything thoroughly.
- Muffin Tin: This will serve as the mold for your granola cups, giving them that perfect shape. Choose a non-stick variety or line it with cupcake liners to ensure easy removal.
- Spoon or Rubber Spatula: You’ll want to use this for mixing as well as for packing the granola mixture into the muffin tin. A rubber spatula helps to scrape down the sides and get every last bit out of the bowl.
- Refrigerator: The key to making your granola cups set perfectly is a bit of time in the fridge, where they can firm up into their deliciously bite-sized shape.
Preparation is simple, but remember to gather all your ingredients beforehand. A chaotic kitchen can distract from the joy of making these granola cups, so take a moment to set up your workspace!
Ingredients for No Bake Peanut Butter Granola Cups
- 1 cup granola: Select your favorite granola blend. For extra flavor, look for versions with fruits or nuts.
- 1/2 cup peanut butter: Creamy or crunchy, the choice is yours! Consider substituting almond or cashew butter for a unique twist.
- 1/4 cup honey or maple syrup: Both sweeteners offer a sticky bond that holds everything together. Maple syrup provides a lovely earthy flavor, while honey delivers classic sweetness.
- 1/4 cup chocolate chips: Mini chocolate chips melt beautifully into the mixture and are perfect for a sweet finish. Try dark, milk, or even white chocolate to customize it to your taste.
- 1/2 teaspoon vanilla extract: This adds a subtle warmth and depth to your granola cups.
Feel free to replace any of these ingredients according to what you have on hand or dietary preferences, making this recipe wonderfully flexible yet always delicious.
How to Make No Bake Peanut Butter Granola Cups
-
Combine Ingredients: In a mixing bowl, combine the granola, peanut butter, honey or maple syrup, chocolate chips, and vanilla extract. Mix well until all the ingredients are evenly coated. This step ensures every bite is bursting with flavor, so take your time!
-
Prepare Muffin Tin: Line a muffin tin with cupcake liners. If you use a non-stick pan, greasing it lightly will help ease the removal process when your cups are done.
-
Pack the Mixture: Spoon the mixture into the lined muffin tin, packing it down firmly. Each cup should feel snug and tightly packed for best results.
-
Chill to Set: Place the muffin tin in the refrigerator for at least 30 minutes to allow the granola cups to set properly. This cooling time helps everything bond together beautifully, making them easier to handle.
-
Enjoy!: Once set, gently remove the cups from the muffin tin and enjoy your no-bake granola cups! They make for a satisfying munch and can be stored for later—if they last that long!
Chef’s Notes & Helpful Tips
- Make-Ahead Tips: These granola cups last well in the fridge for up to a week, making them an ideal snack to prepare ahead of time for busy weeks.
- Cooking Alternatives: If you want to experiment, try these granola cups in the air fryer for a very short burst to slightly crisp them up, or even bake them at low temperatures if you prefer a more toasted flavor.
- Customization Ideas: Get creative! Add dried fruits like cranberries or apricots, or switch out the peanut butter for seed butter to cater to nut allergies. A sprinkle of cinnamon adds a delightful warmth.
Common Mistakes to Avoid
Creating these delightful granola cups can be nearly foolproof, but watch out for a few common pitfalls:
- Not Packing Firmly: Failing to pack the granola mixture firmly enough can cause the cups to crumble when removed. Don’t be shy—press down firmly!
- Skipping the Refrigeration: Patience is key! Skipping the refrigeration step results in non-set cups that don’t hold their shape. Be sure to chill for the recommended time.
- Using a Sticky Muffin Tin: If you forgo liners or greasing, you may end up with sticky granola cups that cling desperately to the tin. Always prepare your baking vessel!
What to Serve With No Bake Peanut Butter Granola Cups
Pairing these scrumptious granola cups can enhance your snacking experience:
- Fresh Fruit: Serve alongside fresh strawberries, bananas, or apples for a refreshing contrast to the rich peanut butter.
- Greek Yogurt: A dollop of creamy Greek yogurt adds protein and tang, creating a balanced bite that elevates this treat.
- Smoothies: Blend your favorite fruits and greens, and enjoy these granola cups as a side for a wholesome meal.
- Milk or Nut Milk: Pair with a glass of cold milk—or any nut milk—for a classic combination.
- Trail Mix: Create a fun platter of trail mix and granola cups for a perfect grab-and-go snack.
- Coffee or Tea: The richness of coffee or the warmth of herbal tea complements the nutty flavors beautifully.
- Ice Cream: For an indulgent dessert, top a scoop of ice cream with crushed granola cups as a crunchy topping.
Storage & Reheating Instructions
These No Bake Peanut Butter Granola Cups store beautifully! Keep them in an airtight container in the refrigerator for up to a week. If you want to indulge later, freeze them individually wrapped or in a container. For a delightful treat, just take one out and enjoy it straight from the freezer or allow it to warm slightly at room temperature for a couple of minutes.
Estimated Nutrition Information
Servings: 12
- Calories: Approximately 130 per cup
- Protein: 4g
- Carbohydrates: 18g
- Fat: 6g
(Disclaimer: Nutritional values may vary based on ingredient brands and quantities used. These are estimated figures for general guidance.)
FAQs
1. Can I replace peanut butter with other nut or seed butters?
Absolutely! Almond butter, cashew butter, or sunflower seed butter work wonderfully. Each will lend its own unique flavor to the cup.
2. How long can I store the granola cups?
In an airtight container in the refrigerator, they last for about a week. In the freezer, they keep well for up to three months.
3. Can I add protein powder to the mixture?
Yes! You can stir in a scoop of your preferred protein powder while mixing the ingredients. It’ll boost the nutritional value while adding a slight creaminess.
4. Are these granola cups suitable for a gluten-free diet?
You can easily make them gluten-free by opting for gluten-free granola and checking your other ingredients for gluten cross-contamination.
5. What’s the best way to serve them?
Enjoy these granola cups as a standalone snack, or pair them with yogurt or fruit. They also serve well at gatherings when shared on a platter!
Wrapping up this culinary journey, these No Bake Peanut Butter Granola Cups invite warmth and satisfaction into your life. Whether you seek a quick snack, energy-boosting breakfast, or a delightful treat during a cozy evening in, this recipe promises to delight your senses. So, roll up your sleeves, call upon your creative spirit, and embark on creating these flavorful cups. Each bite holds the potential for joyous moments and sweet connections, helping to nourish both body and soul. Enjoy!
Print
No Bake Peanut Butter Granola Cups
- Prep Time: 10 minutes
- Cook Time: 30 minutes
- Total Time: 40 minutes
- Yield: 12 servings 1x
- Category: Snack
- Method: No-Bake
- Cuisine: American
- Diet: Vegetarian
Description
Indulge in these delightful No Bake Peanut Butter Granola Cups, perfect for a quick snack or a satisfying breakfast on the go.
Ingredients
- 1 cup granola
- 1/2 cup peanut butter
- 1/4 cup honey or maple syrup
- 1/4 cup chocolate chips
- 1/2 teaspoon vanilla extract
Instructions
- Combine Ingredients: In a mixing bowl, combine the granola, peanut butter, honey or maple syrup, chocolate chips, and vanilla extract. Mix well until all the ingredients are evenly coated.
- Prepare Muffin Tin: Line a muffin tin with cupcake liners.
- Pack the Mixture: Spoon the mixture into the lined muffin tin, packing it down firmly.
- Chill to Set: Place the muffin tin in the refrigerator for at least 30 minutes to allow the granola cups to set properly.
- Enjoy!: Once set, gently remove the cups from the muffin tin and enjoy your no-bake granola cups!
Notes
These granola cups can last well in the fridge for up to a week. Feel free to substitute ingredients based on dietary preferences.
Nutrition
- Serving Size: 1 cup
- Calories: 130
- Sugar: 8g
- Sodium: 50mg
- Fat: 6g
- Saturated Fat: 1g
- Unsaturated Fat: 5g
- Trans Fat: 0g
- Carbohydrates: 18g
- Fiber: 2g
- Protein: 4g
- Cholesterol: 0mg