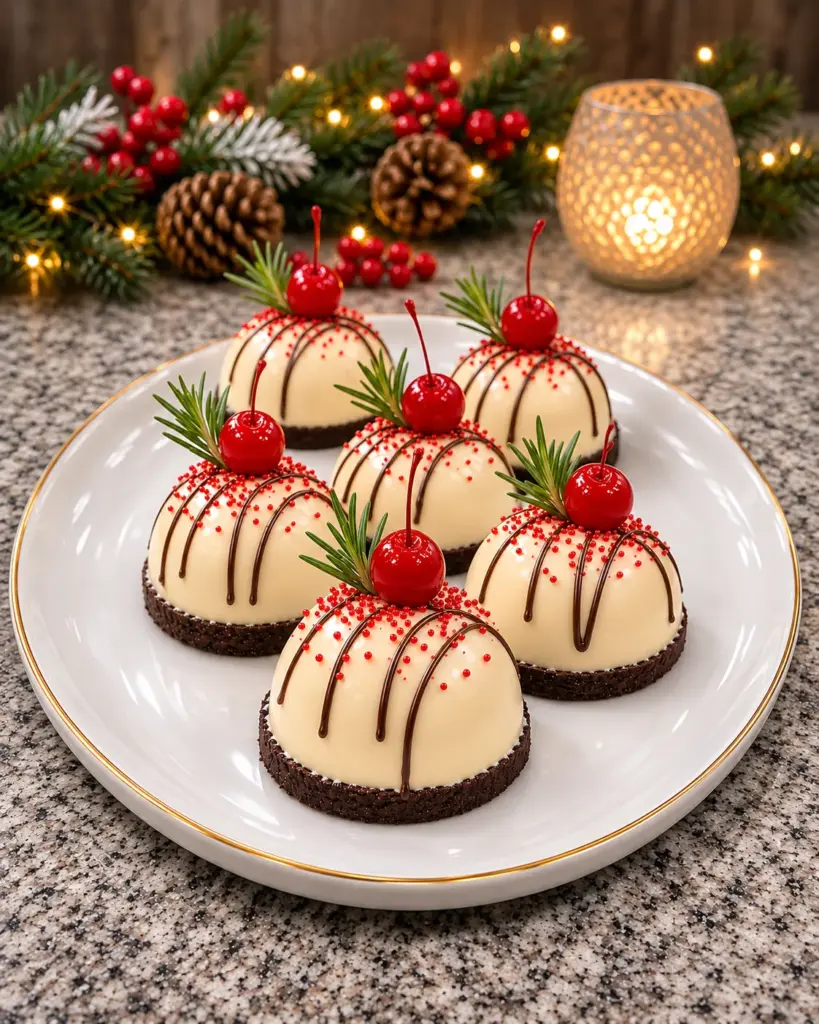
Christmas White Chocolate Mousse Domes look like elegant little holiday desserts, but each one is built from a simple chocolate cookie base and a light, creamy white chocolate mousse. A dark chocolate drizzle, tiny red sugar pearls, a cherry, and a small rosemary sprig turn the pale domes into a festive dessert platter.
These are no-bake treats that need time in the freezer and refrigerator rather than time in the oven. Freeze the mousse in silicone half-sphere molds so the domes release cleanly, place them on chilled cookie discs, and let them thaw slowly in the refrigerator. Decorate just before serving for a smooth finish and bright color.
Why You’ll Love These Christmas Mousse Domes
The flavor combination is familiar and crowd friendly: sweet white chocolate, soft vanilla cream, and a dark chocolate cookie crust. The semisweet drizzle cuts some of the sweetness, while the small red and green decorations make each serving look special. Individual domes are easy to portion and arrange on a platter.
The steps are also easy to divide across two days. Make and freeze the mousse domes ahead, press the cookie bases while they chill, then assemble and thaw in the refrigerator. The cherries and rosemary go on last. That schedule leaves the final day mostly free for serving.
Ingredients for Christmas White Chocolate Mousse Domes
For the Chocolate Cookie Bases
- 2 cups (about 200 g) chocolate sandwich cookie crumbs: Crush the whole cookies, filling included, into fine crumbs. Fine crumbs make discs that hold together under the mousse.
- 5 tablespoons (70 g) unsalted butter, melted: Stir into the crumbs to bind them. Let the butter cool slightly if it is very hot.
For the White Chocolate Mousse
- 1 teaspoon powdered gelatin: A small amount helps the mousse hold the rounded mold shape after thawing.
- 1 tablespoon cold water: Sprinkle gelatin over the water and let it bloom before dissolving it in warm cream.
- 8 oz (225 g) white chocolate, finely chopped: Use a white chocolate you enjoy eating. Fine pieces melt smoothly when warm cream is added.
- 1½ cups (360 ml) heavy cream, divided: Warm ½ cup with the gelatin for the white chocolate base, then whip the remaining 1 cup to fold into the cooled mixture.
- 1 teaspoon vanilla extract: Adds a gentle vanilla finish to the mousse.
For Decorating
- 2 oz (55 g) semisweet chocolate, melted: Drizzle thin lines across the domes. Let it cool slightly so it does not melt the surface.
- 6 maraschino cherries with stems, drained and patted dry: One cherry crowns each dome. Drying prevents red syrup from running down the mousse.
- 6 small rosemary sprigs: A tiny green sprig beside each cherry gives a festive look. Remove the woody sprig before eating.
- 1 tablespoon red sugar pearls or tiny red sprinkles: Scatter lightly while the chocolate drizzle is still soft.
Equipment and Mold Size
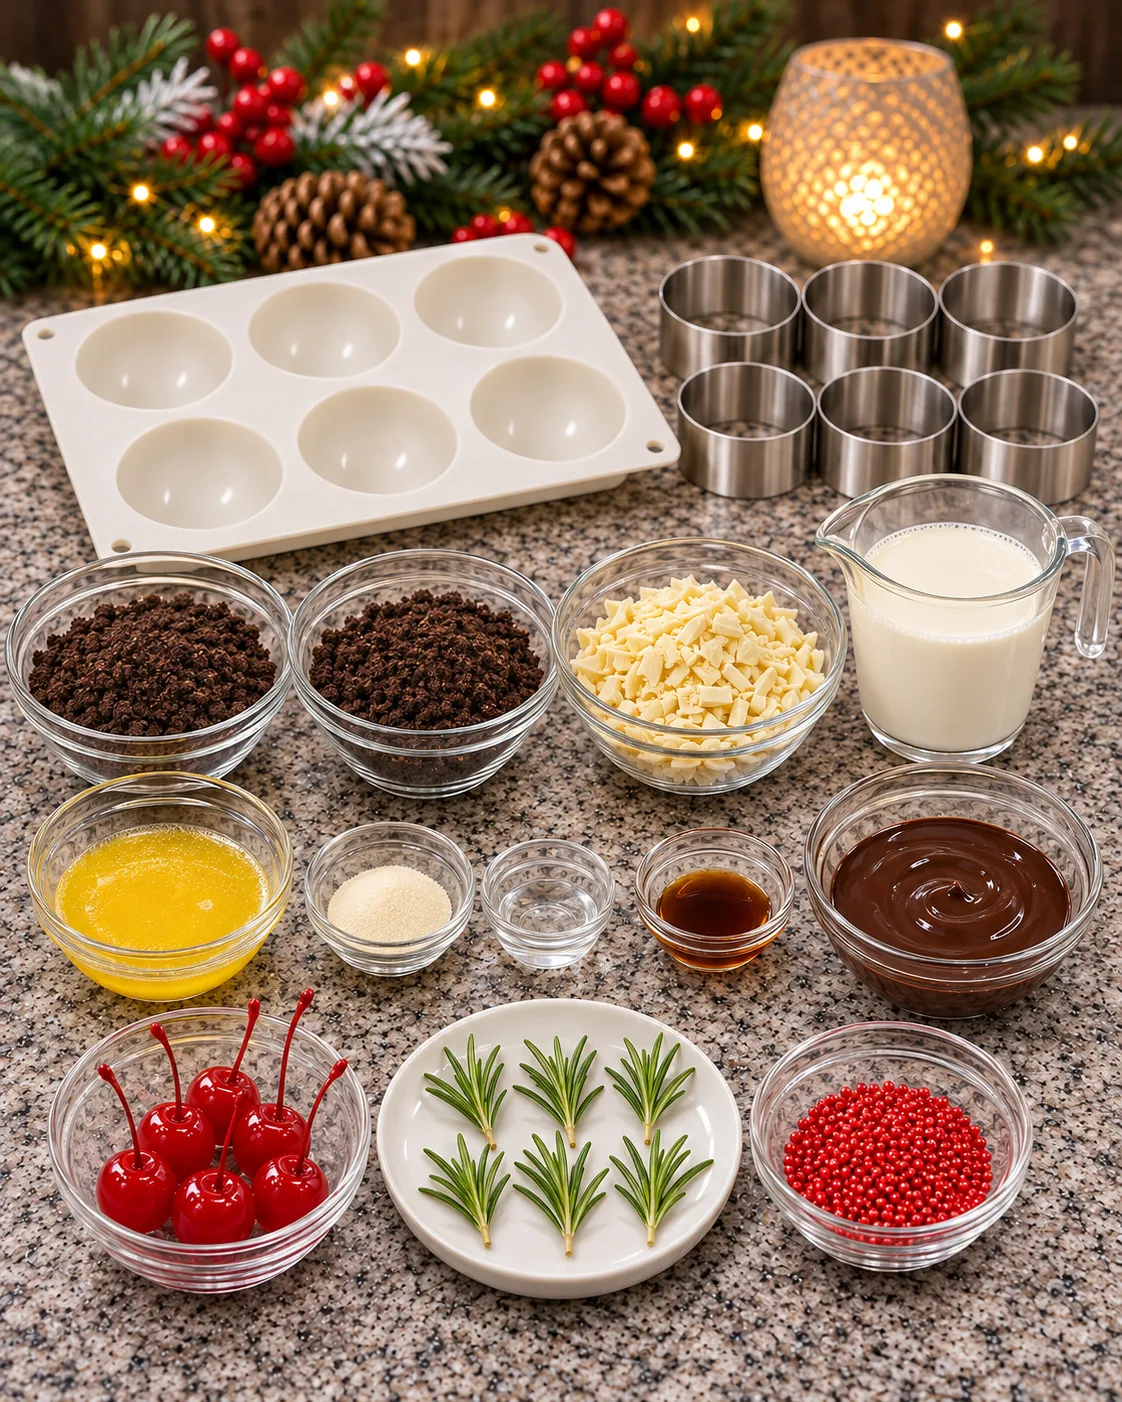
Use a silicone half-sphere mold with six cavities, each holding about ½ cup. Cavities around 2½ inches wide suit the amount of mousse in this recipe. You will also need a tray that fits under the mold in the freezer, six round cutters or rings for the cookie bases, parchment paper, a whisk, a spatula, and a hand mixer for the cream.
The base discs should be just a little wider than the domes so a dark border shows around the bottom, as in the photo. If your mold cavities are larger, the recipe may make fewer domes; if smaller, you may have extra mousse. Divide it evenly and avoid overfilling the mold so the flat sides are easy to attach to the cookie bases.
Instructions: How to Make Christmas White Chocolate Mousse Domes
- Bloom the gelatin. Put 1 tablespoon cold water in a small bowl. Sprinkle 1 teaspoon powdered gelatin evenly over it and let stand for about 5 minutes. The mixture should absorb the water rather than remain as dry powder.
- Make the white chocolate base. Put 8 oz (225 g) finely chopped white chocolate in a heatproof bowl. Warm ½ cup from the 1½ cups heavy cream until steaming but not boiling. Stir the bloomed gelatin into the warm cream until fully dissolved, then pour the cream over the chocolate. Let stand for 1 to 2 minutes and stir gently until smooth. Stir in 1 teaspoon vanilla extract. Let the mixture cool until lukewarm; it should still flow but not feel hot.
- Whip the remaining cream. Beat the remaining 1 cup heavy cream to medium peaks. The cream should hold shape while still looking smooth, not grainy or stiff. Fold a spoonful into the cooled white chocolate mixture to lighten it, then fold in the rest gently until no streaks remain.
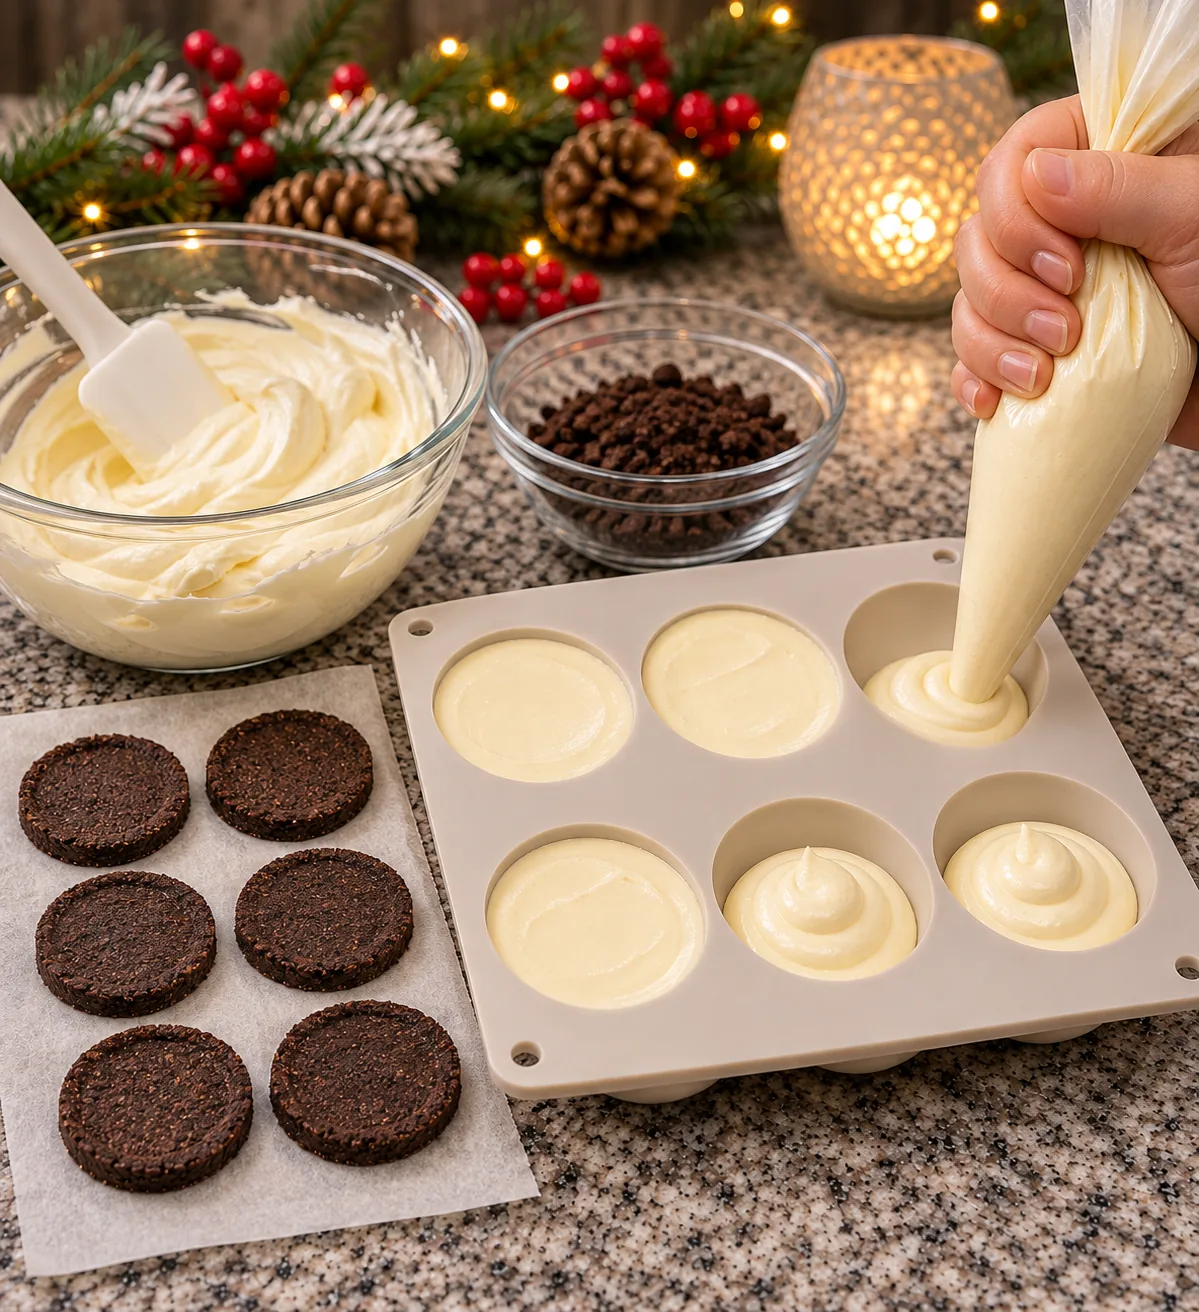
- Fill and freeze the domes. Set a six-cavity silicone half-sphere mold on a flat tray. Pipe or spoon the mousse into the cavities, tap the tray lightly to release large air pockets, and smooth each flat side with an offset spatula. Freeze for at least 4 hours, until the domes are fully firm and release cleanly.
- Make six cookie bases. Mix 2 cups (about 200 g) chocolate sandwich cookie crumbs with 5 tablespoons (70 g) melted unsalted butter until evenly moistened. Divide into six portions. Press each portion firmly into a 2¾-inch ring or cutter on parchment to make a disc roughly ¼ to ⅜ inch thick. Chill for at least 30 minutes, then remove the rings carefully.
- Assemble and thaw. Peel the silicone away from each frozen mousse dome and place it flat-side down on a chilled cookie disc. Transfer to a tray or serving plate, cover without touching the domes, and refrigerate for about 2 to 3 hours until thawed but still nicely set.
- Decorate shortly before serving. Melt 2 oz (55 g) semisweet chocolate and let it cool slightly. Spoon it into a small piping bag and drizzle fine lines over the six domes. Scatter on 1 tablespoon red sugar pearls or tiny red sprinkles while the drizzle is soft. Top each dome with one of the 6 maraschino cherries with stems, drained and patted dry, and one of the 6 small rosemary sprigs. Serve chilled, removing the rosemary before eating.
How to Keep the Mousse Smooth
Chop the white chocolate finely. Small pieces melt quickly and evenly. Large chunks may stay solid while the cream cools, tempting you to overheat the mixture.
Dissolve the gelatin completely. Let the powder absorb the cold water first. When it goes into the warm cream, stir until you cannot see any grains or lumps. Unmelted gelatin can leave tiny chewy pieces in the mousse.
Cool the chocolate before folding. Hot white chocolate will deflate the whipped cream. If it is cold enough to begin setting firmly, it may make streaks. Aim for lukewarm and fluid.
Whip to medium peaks. Overwhipped cream is hard to fold smoothly and can make the mousse grainy. Medium peaks give it volume without roughness.
Freeze the mold flat. Set the silicone mold on a tray before filling, then move the entire tray to a level freezer shelf. A tilted mold creates uneven flat sides and makes assembly harder.
Unmold while frozen. Firm mousse releases with a clean curve. Let it thaw only after it has been placed on the cookie base; trying to peel the mold away from a soft dome can dent it.
Common Mistakes to Avoid
Heating the cream to a boil: Gentle steam is enough to dissolve gelatin and melt the chopped white chocolate. Boiling can make the chocolate mixture harder to control.
Skipping the chill for cookie discs: The bases need time for butter to firm. Warm crumb discs can crack as you lift them or soften under the mousse.
Using wet cherries: Maraschino syrup can run down the pale dome and stain it. Drain the cherries well and pat them dry right before decorating.
Pouring hot dark chocolate over mousse: Warm, fluid semisweet chocolate makes attractive lines; hot chocolate can melt the surface. Let it cool slightly after melting and test a small line first.
Serving while frozen solid: The domes are frozen only for shaping. Allow 2 to 3 hours in the refrigerator after assembly so the mousse becomes creamy again.
Make-Ahead Plan for Christmas
One or two days before: Prepare the mousse and freeze it in the silicone mold. Press the cookie bases and chill them in a covered container. If you need to store the domes longer than a day, transfer them after freezing to a freezer-safe container, separated from any items that might mark their surfaces.
On serving day: Unmold the frozen domes onto the chilled bases and allow them to thaw in the refrigerator. Melt the semisweet chocolate and decorate shortly before bringing the platter to the table. Add the cherries, rosemary, and red pearls last for the brightest finish.
Serve one dome per guest on a small dessert plate. A warm drink such as coffee pairs well with the chilled, sweet mousse. Keep the platter refrigerated until serving so the domes hold their shape.
Storage and Freezing
Refrigerate assembled domes: Keep them covered in the refrigerator for up to 2 days. The cookie bases gradually soften where they meet the mousse, so they are at their crispest on the day of assembly.
Freeze undecorated domes: Freeze the molded mousse for up to 1 month in a well-sealed container after it is fully firm. Keep the cookie discs separately wrapped. Assemble while the domes are frozen and thaw in the refrigerator before decorating.
Transport: Carry the chilled domes in a rigid, covered container over ice packs. Add cherries and rosemary at the destination if there is a chance they will shift during travel.
FAQ: Christmas White Chocolate Mousse Domes
Do I need a silicone dome mold?
A silicone half-sphere mold gives the smoothest shape and easiest release. You can use small rounded bowls lined with plastic wrap, but the surface will show folds and the domes will look more rustic.
Why is gelatin included?
The small amount of gelatin helps the mousse keep its rounded shape after it thaws. Without it, the domes may soften and slump on the cookie bases.
Can I make the domes ahead?
Yes. Keep the molded mousse frozen and the cookie discs chilled, then assemble and thaw the domes in the refrigerator on the serving day. Add the drizzle and garnishes near serving time.
Can I skip the rosemary garnish?
Yes. The rosemary is decorative. If using it, choose small clean sprigs and remove them before eating because the stems are woody.
How long do the assembled domes need to thaw?
About 2 to 3 hours in the refrigerator for ½-cup domes. Larger molds may need longer. The mousse should feel creamy when served, not hard or icy.
Conclusion: A Festive Make-Ahead Dessert
Christmas White Chocolate Mousse Domes turn a few familiar ingredients into a polished holiday dessert. Press the chocolate cookie bases, fold the white chocolate mousse gently, freeze it for clean curves, and let it thaw on the bases before decorating. Dark chocolate lines, red cherries, tiny pearls, and rosemary make the final platter ready for Christmas.
Print
Christmas White Chocolate Mousse Domes
- Prep Time: 45 minutes
- Cook Time: 0 minutes
- Total Time: About 7 hours, including freezing and thawing
- Yield: 6 domes 1x
- Category: Desserts
- Method: No-Bake
Description
Six no-bake white chocolate mousse half-spheres on dark chocolate cookie discs, finished with semisweet drizzle, red pearls, cherries, and rosemary.
Ingredients
- 2 cups (about 200 g) chocolate sandwich cookie crumbs
- 5 tablespoons (70 g) unsalted butter, melted
- 1 teaspoon powdered gelatin
- 1 tablespoon cold water
- 8 oz (225 g) white chocolate, finely chopped
- 1½ cups (360 ml) heavy cream, divided
- 1 teaspoon vanilla extract
- 2 oz (55 g) semisweet chocolate, melted
- 6 maraschino cherries with stems, drained and patted dry
- 6 small rosemary sprigs
- 1 tablespoon red sugar pearls or tiny red sprinkles
Instructions
Step 1 Sprinkle 1 teaspoon powdered gelatin over 1 tablespoon cold water in a small bowl and let bloom for about 5 minutes.
Step 2 Place 8 oz (225 g) white chocolate, finely chopped, in a heatproof bowl. Warm ½ cup from 1½ cups (360 ml) heavy cream, divided, until steaming but not boiling. Stir in the bloomed gelatin until dissolved, pour over the chocolate, stand 1 to 2 minutes, and stir smooth. Add 1 teaspoon vanilla extract. Cool until lukewarm but still fluid.
Step 3 Whip the remaining 1 cup heavy cream to medium peaks. Gently fold it into the cooled white chocolate mixture until uniform. Spoon or pipe the mousse into six roughly ½-cup silicone half-sphere mold cavities, tap lightly, smooth the flat sides, and freeze at least 4 hours until firm.
Step 4 Mix 2 cups (about 200 g) chocolate sandwich cookie crumbs with 5 tablespoons (70 g) unsalted butter, melted. Divide into six portions and firmly press into parchment-lined 2¾-inch rings to make six cookie discs. Refrigerate at least 30 minutes.
Step 5 Unmold the frozen mousse and place one dome flat-side down on each chilled cookie base. Cover without touching the domes and refrigerate for 2 to 3 hours until thawed but set.
Step 6 Just before serving, drizzle the domes with 2 oz (55 g) semisweet chocolate, melted and cooled slightly. Scatter on 1 tablespoon red sugar pearls or tiny red sprinkles. Top each dome with one of the 6 maraschino cherries with stems, drained and patted dry, and one of the 6 small rosemary sprigs. Serve chilled, removing rosemary before eating.
Notes
Bloom gelatin in cold water and dissolve it completely in warm cream. Cool the white chocolate mixture until lukewarm before folding in whipped cream. Unmold domes while frozen, then thaw them on chilled cookie bases in the refrigerator. Dry cherries well and add them just before serving.