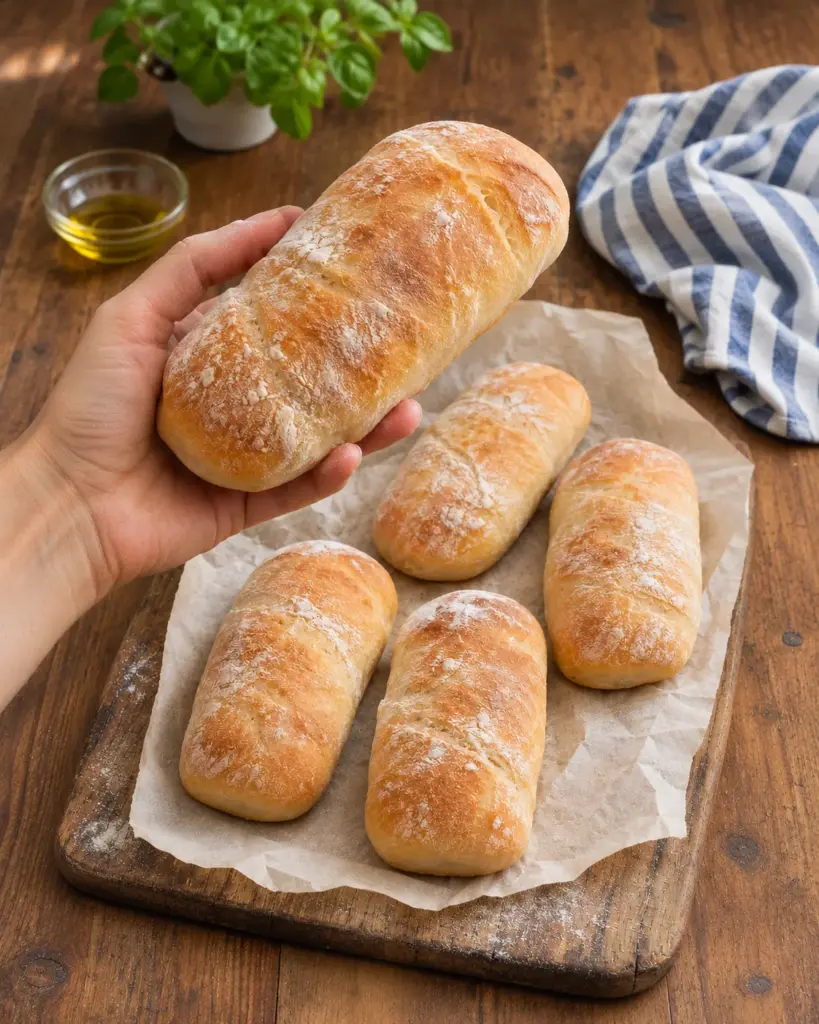
Homemade Panini Bread gives you soft, sturdy sandwich rolls with a thin golden crust and a lightly flour-dusted finish. The dough is made from bread flour, water, yeast, honey, salt, and olive oil. Once baked, the oblong rolls are easy to split, fill, and press in a panini grill or skillet.
The rolls pictured are deliberately plain. Their pale flour dusting comes from shaping, and there are no herbs, cheese, seeds, or other toppings on the finished bread. Optional seasonings are listed if you want a different batch later, but the basic version lets the bread work with nearly any savory filling. This recipe makes six sandwich-size rolls and uses a straightforward knead, rise, shape, proof, and bake method.
Why Make Panini Bread at Home?
Freshly baked rolls have a mild flavor that supports the fillings rather than competing with them. Olive oil keeps the dough supple, while bread flour provides enough structure for slicing and pressing. A slightly elongated shape gives a useful surface for cheese, roasted vegetables, deli meat, or grilled chicken. You can also simply toast the rolls and serve them with soup.
Making the dough yourself lets you choose the size. Six pieces create generous panini rolls; you can make smaller ones if you want appetizers, but baking time will change. The dough is mixed from pantry ingredients, and the optional steam step can give the crust a little more bite. Leave out the steam if you prefer a softer roll for pressing.
Ingredients for Homemade Panini Bread
For the dough
- 4 cups bread flour, spooned and leveled
- 1½ cups lukewarm water, approximately 100–105°F
- 2¼ teaspoons instant or active dry yeast
- 1 tablespoon honey or granulated sugar
- 2 teaspoons fine sea salt
- 2 tablespoons extra-virgin olive oil
For shaping
- ¼ cup bread flour or all-purpose flour for dusting
- Olive oil for lightly greasing the bowl
- 1 cup boiling water for optional oven steam
Optional additions
- 1 teaspoon dried Italian seasoning
- 1 teaspoon garlic powder
- 1 tablespoon finely chopped rosemary
- ½ teaspoon cracked black pepper
- ¼ cup grated Parmesan
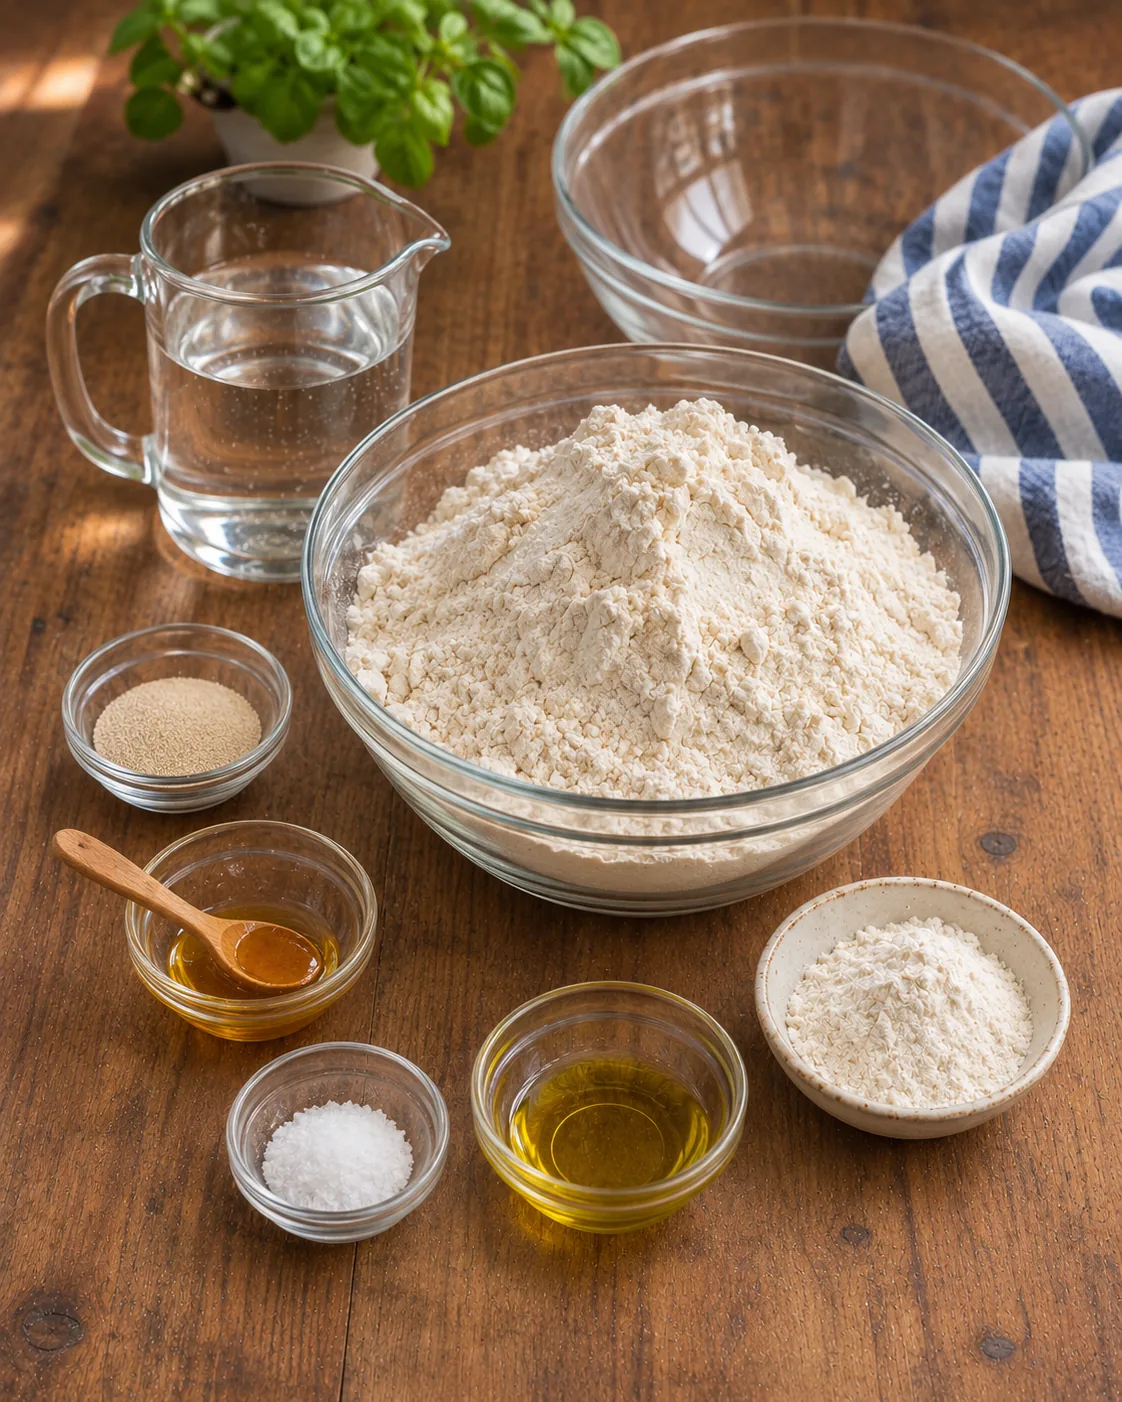
Use the plain base recipe for rolls that match the photo. Bread flour gives the dough a pleasantly chewy structure; if measuring by cups, spoon it into the cup and level it instead of scooping densely from the bag. The water should feel warm rather than hot. Instant yeast can be mixed directly with the flour. If you use active dry yeast, dissolve it in the warm water with the honey or sugar and wait until it looks foamy before mixing the dough.
The tablespoon of honey or sugar gives the yeast a little food and helps the crust brown. The two teaspoons of fine sea salt make the plain bread taste complete. Extra-virgin olive oil adds tenderness and a subtle savory note. The quarter cup of extra flour is for the work surface and a light final dusting; use it sparingly so the dough stays supple.
Equipment and Dough Texture
You will need a large bowl, measuring cups or a kitchen scale, a scraper or spatula, a parchment-lined baking sheet, and a wire rack. A stand mixer with a dough hook is helpful but not required. A second sturdy metal pan is needed only if you choose the optional oven-steam step. Avoid using a glass pan for added boiling water because sudden heat changes can damage it.
This is a moderately soft dough. It may feel tacky at first, especially before the flour has absorbed all the water. Give it a few minutes of kneading before adding more flour. It should eventually become smooth, elastic, and easy to lift, while still feeling slightly soft. Adding too much dusting flour can make the rolls heavy and dry.
Instructions: How to Make Homemade Panini Bread
1. Mix and knead the dough
For instant yeast, combine the 4 cups bread flour, spooned and leveled, with 2¼ teaspoons instant or active dry yeast, 1 tablespoon honey or granulated sugar, and 2 teaspoons fine sea salt in a large bowl. Add 1½ cups lukewarm water at approximately 100–105°F and 2 tablespoons extra-virgin olive oil. Stir until a shaggy dough forms. If using active dry yeast instead, first stir it and the honey or sugar into the warm water, wait 5 to 10 minutes for foam, then add that mixture to the flour, salt, and oil.
Knead by hand for about 10 to 12 minutes, or with a dough hook on low speed for 7 to 9 minutes, until smooth and elastic. Use only a small amount from the ¼ cup bread flour or all-purpose flour for dusting when the dough sticks to the work surface. It should stretch without tearing immediately. If it feels dry and stiff, pause and let it rest for 5 minutes before continuing.
2. Let the dough rise
Lightly coat a clean bowl with olive oil for lightly greasing the bowl. Place the dough inside, turn it once to coat, cover, and let rise in a warm draft-free place for 60 to 90 minutes, until roughly doubled. The exact time depends on room temperature and yeast activity, so follow the dough’s size rather than the clock alone.
3. Divide and shape the rolls
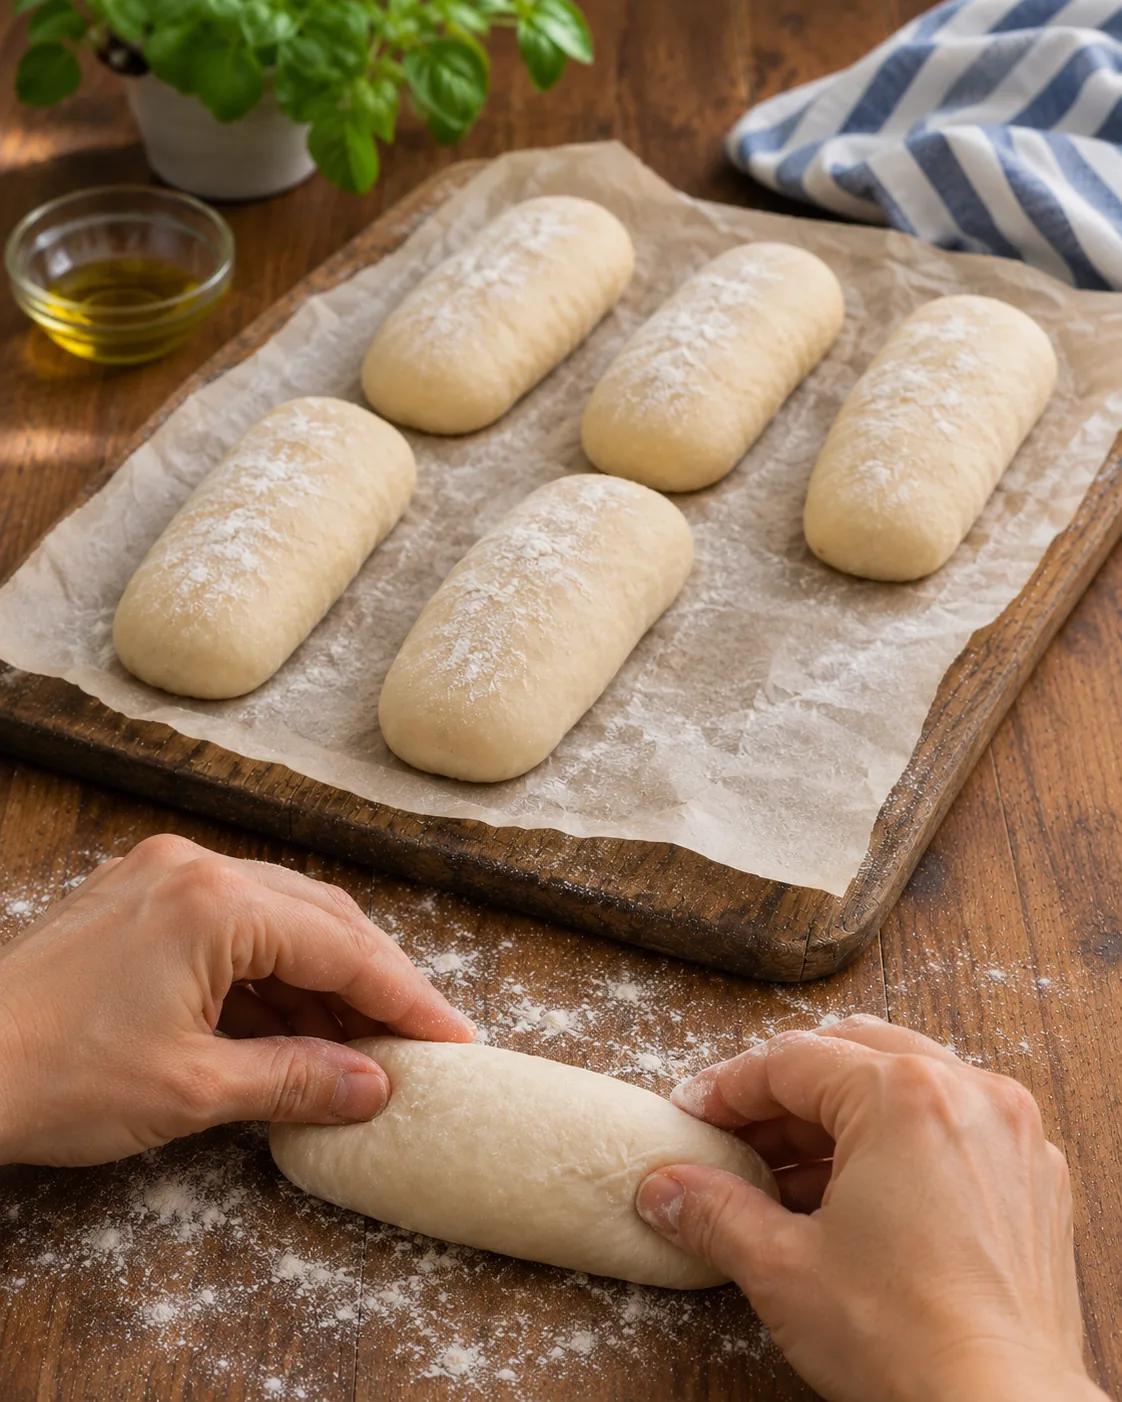
Tip the risen dough onto a lightly floured surface. Divide it into six equal portions. Gently pat each into a small rectangle, fold the long sides toward the center, pinch the seam, and roll it under your palms into a smooth oblong about 6 to 7 inches long. Put the rolls seam-side down on a parchment-lined baking sheet, leaving a few inches between them. Dust them lightly with some of the remaining flour. Do not add herbs, cheese, seeds, or toppings if you want the plain rolls shown in the photo.
4. Proof and prepare the oven
Cover the shaped rolls loosely and let them rise for 30 to 45 minutes, until visibly puffy. While they proof, heat the oven to 425°F (220°C) with a rack in the middle. For optional steam, place an empty sturdy metal pan on a lower rack as the oven heats. Keep 1 cup boiling water ready only if you will use that pan. Steam encourages a slightly crisper outer crust; the rolls bake well without it too.
5. Bake and cool
Uncover the rolls. Place the baking sheet on the middle rack. If using steam, carefully pour the 1 cup boiling water for optional oven steam into the preheated metal pan on the lower rack and close the oven door promptly, keeping hands and face clear of the hot vapor. Bake at 425°F (220°C) for 18 to 22 minutes, until the rolls are golden and feel light for their size. Transfer to a wire rack and cool for at least 20 minutes before slicing.
How to Shape Rolls for Panini
An oblong shape is more useful for sandwiches than a very round dinner roll. After dividing the dough, flatten each piece gently enough to remove large air bubbles but not so aggressively that it becomes dense. Fold and pinch to create a smooth top surface, then roll from the center outward to lengthen the piece. The seam goes underneath on the baking sheet so the top can rise evenly.
Try to make all six pieces the same size. Equal rolls bake at the same rate and give a consistent sandwich portion. If the dough springs back and resists lengthening, let it rest under a towel for 5 to 10 minutes, then finish shaping. A small dusting of flour gives the rustic finish in the reference image without burying the dough under a thick white layer.
Instant Yeast vs. Active Dry Yeast
The recipe allows either kind. Instant yeast is convenient because it can go directly into the flour mixture. Active dry yeast is usually dissolved in the measured warm water first. Give it 5 to 10 minutes; visible foam shows it is active. If the surface remains completely flat, check the water temperature and the yeast’s age before committing the full batch of flour.
Both types are used at the same listed amount of 2¼ teaspoons. Rise times can vary, so do not force the schedule. The first rise is ready when the dough is roughly doubled, and the shaped rolls are ready to bake when they look puffy and a light fingertip press springs back slowly. Overproofed rolls may deflate as they move into the oven; underproofed rolls can split unpredictably.
Do You Need Oven Steam?
No. The rolls can go into a fully heated oven on their parchment-lined sheet and bake to a warm golden color. Steam is an optional way to delay crust setting for the first part of the bake and produce a slightly crisper shell. If you want soft panini bread that will later be toasted in a press, skipping the steam is a reasonable choice.
If using the steam method, place a sturdy empty metal pan on a lower rack while preheating. Carefully add the measured boiling water after the rolls enter the oven, then close the door. Use oven mitts and stand back from the burst of hot vapor. Do not pour water onto the oven floor or into a glass dish. The flour-dusted, plain top of the rolls does not require an egg wash or any other topping.
Tips for Soft, Even Panini Rolls
Measure the flour carefully and give the dough time to come together. A dough that is slightly tacky at the start often becomes easier to handle after kneading. Resist adding the full ¼ cup of shaping flour at once. The goal is a supple bread roll with enough structure to slice, not a dry dough that is easy to handle only because it has too much flour.
Keep the oven fully preheated before baking. A cool oven can let the rolls spread before they rise. Leave space on the baking sheet so they can expand without fusing together. Let the baked rolls cool on a rack; trapped steam underneath can soften the bottoms if they stay on a hot sheet too long.
For the pictured plain batch, do not sprinkle herbs, Parmesan, or seeds over the outside. The optional flavor additions are mixed into the dough for a separate variation. The surface shown in the photo is simply golden bread with a modest flour dusting. That neutral flavor makes the finished rolls flexible for many sandwiches.
Optional Flavor Variations
If you want to change a future batch, add 1 teaspoon dried Italian seasoning or 1 teaspoon garlic powder to the flour before mixing. Finely chopped rosemary and cracked black pepper also suit savory sandwiches. For a cheesy version, fold in the optional ¼ cup grated Parmesan after the dough first comes together. These additions are optional and are not included in the plain flour-dusted rolls pictured.
Keep the base liquid and flour quantities the same when using these small dry additions. Strong flavors can dominate a sandwich, so start with one or two rather than using every option at once. The plain version is best if you plan to fill the rolls with ingredients that already have a bold seasoning.
How to Serve Panini Bread
Once the rolls are cool enough to slice, cut each horizontally and add your filling. For a hot panini, brush the outside lightly with olive oil, fill with cheese and your preferred savory ingredients, and press until the bread is toasted and the filling is warm. A skillet with a second heavy pan on top can stand in for a dedicated panini press.
These rolls also work without pressing. Fill them with mozzarella and tomatoes, roast chicken and greens, or grilled vegetables. Toasted halves are good with soup or a simple lunch salad. Letting the bread cool before slicing keeps the soft interior from compressing under the knife.
Storage and Reheating
Store fully cooled rolls in an airtight bag or container at room temperature for up to 2 days. For longer storage, wrap each roll well and freeze for up to 2 months. Thaw at room temperature while wrapped, then warm or toast as desired. Avoid refrigerating the plain rolls, which can make bread stale faster.
To refresh a roll, warm it in a 350°F (175°C) oven for about 5 to 8 minutes, or split and toast it in a skillet. If it is going into a panini press, the final grilling step will warm the bread. Do not store filled sandwiches for the same length of time as the plain bread; follow the storage needs of the fillings you choose.
Homemade Panini Bread FAQ
Can I use all-purpose flour instead of bread flour in the dough?
The base recipe is written for 4 cups bread flour. All-purpose flour may make a softer, less chewy roll and can absorb water differently. If substituting, start with a little less water and add the rest only as needed for a soft dough.
Why did my rolls turn out dense?
The dough may have needed more kneading or more time to rise. Use active yeast, keep the dough soft rather than loading it with extra flour, and wait for the first rise to roughly double. Give the shaped rolls time to become visibly puffy before baking.
Can I make the dough ahead?
Yes. After mixing and kneading, cover the dough and refrigerate it overnight in a lightly oiled bowl. Let it warm enough to shape the next day, then proof the shaped rolls until puffy before baking. The timing will be longer than for room-temperature dough.
Are these rolls meant to be pressed?
Yes. Their oblong shape and sturdy crumb make them suitable for slicing, filling, and toasting in a panini press or a weighted skillet. They are also pleasant as plain sandwich rolls.
Are there herbs or cheese on the pictured rolls?
No. The pictured Homemade Panini Bread is plain and lightly dusted with flour. Herbs, garlic, pepper, and Parmesan are optional additions for a different batch, not part of the photographed rolls.
Conclusion
Homemade Panini Bread starts with a simple olive-oil yeast dough and ends with six golden, flour-dusted rolls ready for sandwiches. Knead until smooth, give the dough and shaped pieces enough time to rise, and bake until lightly browned. Keep the base batch plain like the photo, then slice and press the rolls with your favorite fillings.
Print
Homemade Panini Bread
- Prep Time: 30 minutes
- Cook Time: 22 minutes
- Total Time: About 3 hours, including rising and cooling
- Yield: 6 rolls 1x
- Category: Sourdough
- Method: Baking
Description
Six plain oblong panini sandwich rolls with a light flour dusting, thin golden crust, and soft interior.
Ingredients
- 4 cups bread flour, spooned and leveled
- 1½ cups lukewarm water, approximately 100–105°F
- 2¼ teaspoons instant or active dry yeast
- 1 tablespoon honey or granulated sugar
- 2 teaspoons fine sea salt
- 2 tablespoons extra-virgin olive oil
- ¼ cup bread flour or all-purpose flour for dusting
- Olive oil for lightly greasing the bowl
- 1 cup boiling water for optional oven steam
- 1 teaspoon dried Italian seasoning, optional
- 1 teaspoon garlic powder, optional
- 1 tablespoon finely chopped rosemary, optional
- ½ teaspoon cracked black pepper, optional
- ¼ cup grated Parmesan, optional
Instructions
Step 1 For instant yeast, combine 4 cups bread flour, spooned and leveled, with 2¼ teaspoons instant or active dry yeast, 1 tablespoon honey or granulated sugar, and 2 teaspoons fine sea salt. Add 1½ cups lukewarm water, approximately 100–105°F, and 2 tablespoons extra-virgin olive oil, then mix to a shaggy dough. If using active dry yeast, first dissolve it with the honey or sugar in the warm water for 5 to 10 minutes until foamy, then mix with flour, salt, and oil.
Step 2 Knead for 10 to 12 minutes by hand or 7 to 9 minutes with a dough hook, using only a little of the ¼ cup bread flour or all-purpose flour for dusting as needed, until smooth and elastic. For a flavored variation only, add 1 teaspoon dried Italian seasoning, 1 teaspoon garlic powder, 1 tablespoon finely chopped rosemary, ½ teaspoon cracked black pepper, or ¼ cup grated Parmesan during mixing. Omit all additions for the plain pictured rolls.
Step 3 Coat a clean bowl with olive oil for lightly greasing the bowl. Turn dough once to coat, cover, and let rise for 60 to 90 minutes until roughly doubled.
Step 4 Divide the dough into six equal portions. Gently shape each into a smooth oblong about 6 to 7 inches long. Place seam-side down on a parchment-lined baking sheet, dust lightly with remaining flour, cover loosely, and proof for 30 to 45 minutes until visibly puffy. Meanwhile preheat the oven to 425°F (220°C). If using steam, preheat an empty sturdy metal pan on a lower oven rack.
Step 5 Bake the rolls at 425°F (220°C) for 18 to 22 minutes until golden. For optional steam, carefully pour 1 cup boiling water for optional oven steam into the preheated metal pan when the rolls enter the oven and close the door promptly. Keep clear of hot vapor and never use a glass pan for this. Transfer rolls to a rack and cool at least 20 minutes before slicing.
Notes
Use the base dough without optional seasonings for the plain rolls shown. Knead until smooth and elastic without adding too much shaping flour. Shape into six equal oblong rolls and proof until visibly puffy. Optional oven steam gives a crisper crust; skip it for softer rolls.